Introduction
The On Prem Platform provides a cloud-managed edge agent specialized in deploying and running real-time workloads on baremetal resource-constrained devices, where they can perform functions such as high-frequency inference and remediation, right at the source of the signal.
On Prem aims to help you bring your control plane to your edge devices, without the use of heavyweight virtual machines, operator-intensive Kubernetes, or heavyweight Docker images.
A cloud-hosted control plane is made available at console.on-prem.net and api.on-prem.net, and is ready for use by edge devices that are able to phone home to the cloud.
Cloud Console
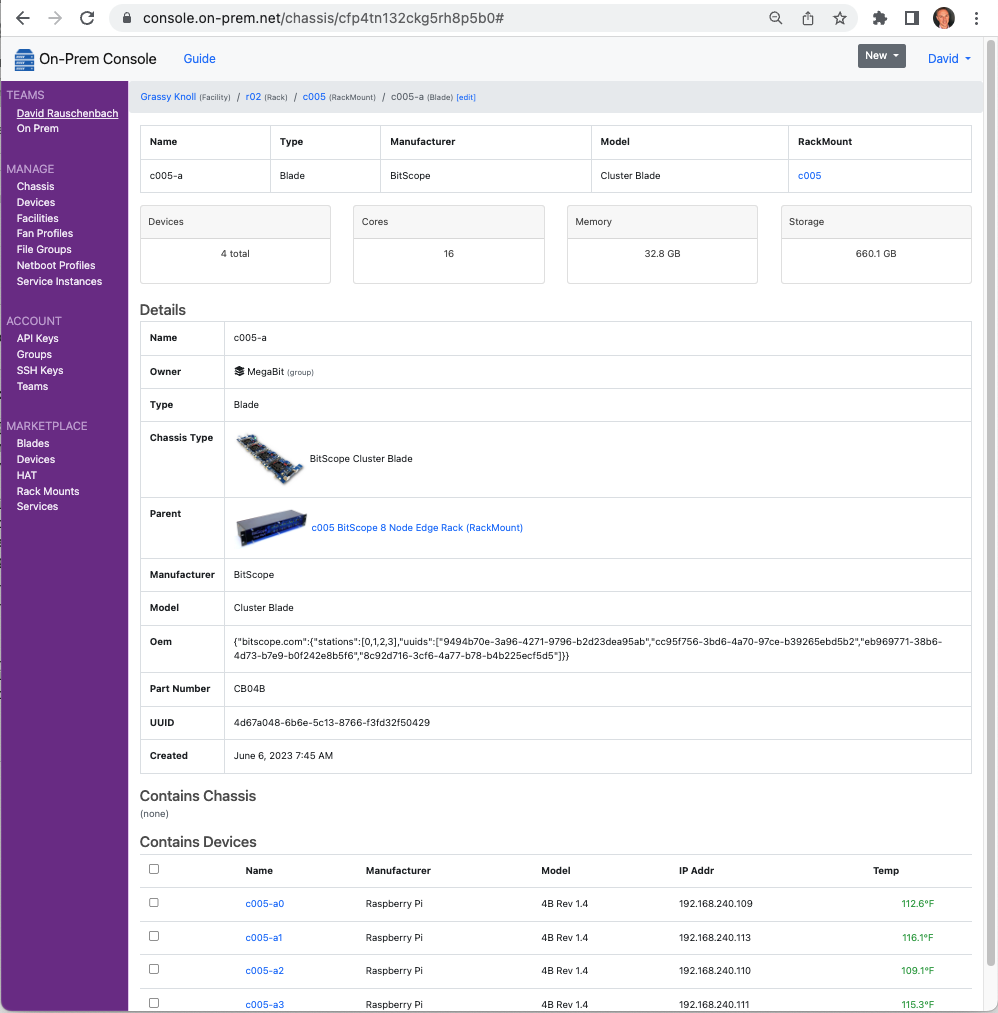
A web console provides a collaborative development experience, while enabling you to organize the runtime environment where your lambdas will run, using a hierarchy of Facility and Device records.
CLI
A CLI enables GitOps and DevOps workflows by providing idempotent configuration capabilities via yaml or json files. The CLI provides access to the full set of functionality provided by the web console.
$ onprem list devices

┌──────────────────────┬───────────────┬──────────────┬─────────────┬───────────────────────────────────┐
│ id                   ┆ name          ┆ manufacturer ┆ model       ┆ uuid                              │
│ ---                  ┆ ---           ┆ ---          ┆ ---         ┆ ---                               │
│ str                  ┆ str           ┆ str          ┆ str         ┆ str                               │
╞══════════════════════╪═══════════════╪══════════════╪═════════════╪═══════════════════════════════════╡
│ cfv5v3h32ckl0mq6al70 ┆ c001-b8-n01   ┆ Raspberry Pi ┆ 4B Rev 1.4  ┆ 8938301d-9e32-5470-8f2b-0dd379cb… │
│ cfv5v8932ckl0mq6amc0 ┆ c001-b8-n03   ┆ Raspberry Pi ┆ 4B Rev 1.4  ┆ 692c82a0-a2ea-550a-9caa-e42debf0… │
│ cfv60ah32ckl0mq6au60 ┆ c001-b8-n04   ┆ Raspberry Pi ┆ 4B Rev 1.4  ┆ acc28e51-0f57-552b-a36e-9023db67… │
│ cfv60o932ckl0mq6b1d0 ┆ c001-b8-n05   ┆ Raspberry Pi ┆ 4B Rev 1.4  ┆ 8225ad60-4ce5-5f8e-958f-0a78a0d6… │
│ cfv60vp32ckl0mq6b38g ┆ c001-b8-n06   ┆ Raspberry Pi ┆ 4B Rev 1.4  ┆ c55f0ba1-359c-5cda-a2d2-c6601428… │
│ cfv624132ckl0mq6bbi0 ┆ c001-b8-n07   ┆ Raspberry Pi ┆ 4B Rev 1.4  ┆ 6af5f0a6-af50-57ce-ba78-9435e223… │
│ cfv623h32ckl0mq6bbc0 ┆ c001-b8-n08   ┆ Raspberry Pi ┆ 4B Rev 1.4  ┆ e430593d-36ce-5f26-9c14-9d6ccaeb… │
│ cfv634h32ckl0mq6bjbg ┆ c001-b8-n09   ┆ Raspberry Pi ┆ 4B Rev 1.4  ┆ 0313d666-d3ed-5656-8468-0ceb1417… │
│ ch2ql7p32ckj9ndqd200 ┆ c006-n1       ┆ NVIDIA       ┆ Jetson Nano ┆ 185b8d7c-5c4a-5f63-86d9-d80bbf72… │
│ chai28932ckjgou9an3g ┆ c006-n2       ┆ NVIDIA       ┆ Jetson Nano ┆ 8ed6b72b-9056-5f3e-8ef4-9a1e537d… │
│ cht7np132ckk7b39k6o0 ┆ seeed-0       ┆ NVIDIA       ┆ null        ┆ 4791cb95-1f40-547f-be80-af538afa… │
│ cht7nv932ckk7b39k8e0 ┆ seeed-1       ┆ NVIDIA       ┆ null        ┆ a9514069-59a1-5301-83e1-51b493fa… │
│ cht7o4h32ckk7b39k9tg ┆ seeed-2       ┆ NVIDIA       ┆ null        ┆ d238d655-3f1e-56db-bc2d-563e57c5… │
│ cht7o9932ckk7b39kb7g ┆ seeed-3       ┆ NVIDIA       ┆ null        ┆ b3bd7b4f-43b9-5c72-bc83-b7ce6874… │
│ cjprdbc3v1vsmvpqo980 ┆ c006-n1       ┆ NVIDIA       ┆ Jetson Nano ┆ 185b8d7c-5c4a-5f63-86d9-d80bbf72… │
│ cjprdt43v1vsmvpqoaug ┆ c006-n2       ┆ NVIDIA       ┆ Jetson Nano ┆ 8ed6b72b-9056-5f3e-8ef4-9a1e537d… │
└──────────────────────┴───────────────┴──────────────┴─────────────┴───────────────────────────────────┘
Edge Agent
The primary component is the Agent, a lean next-generation Rust-based software agent purpose-built to run low-latency lambdas for inference and signal processing on resource-constrained hardware, where insights can immediately inform control systems.
The agent embeds a Lambda service with support for Lua, JavaScript, and WASM language runtimes.
The agent embeds Rust-native (Rust-safe) drivers for interacting with common IoT buses and protocols, and embeds language bindings for the lambdas that wish to make use of them.
Extensible Controllers allow you to create Kubernetes-style robotic control loops that run autonomously at the edge, performing functions such as subscribing to GPIO triggers or other kernel events, and delivering those events to the in-process Lambdas that wish to make use of them.
The agent is able to optionally phone home to the cloud when connectivity permits. When connected, it is able to download new configuration bundles, and make a reverse-tunnel available to operators so that it can be monitored and managed via the cloud console.
Agent
The On Prem Agent is installed wherever you want to run lambdas.
Agent Installation
Debian
Installation on Debian based operating systems, which includes Raspberry Pi OS and Ubuntu, involves the following steps:
- Register our APT repository's public key
- Register our APT repository
- Refresh your packages index
- Install our agent
- Tell systemd to start our agent
- Tell systemd to enable our agent, ensuring it gets started after reboots
wget -qO - https://apt.on-prem.net/public.key | sudo tee /etc/apt/trusted.gpg.d/on-prem.asc
VERSION_CODENAME=`grep "VERSION_CODENAME=" /etc/os-release |awk -F= {' print $2'}|sed s/\"//g`
echo "deb https://apt.on-prem.net/ ${VERSION_CODENAME} main" | sudo tee /etc/apt/sources.list.d/on-prem.list
sudo apt-get update
sudo apt-get -y install on-prem-agent
sudo systemctl start on-prem-agent
sudo systemctl enable on-prem-agent
Docker
Our default image shown below is a multi-architecture manifest, that should automatically provide you with an image compatible with your current hardware architecture.
docker pull onpremnet/agent
Run Interactively
Running interactively is the most efficient way to test new configurations. If anything doesn't work, just Ctrl+C, make some tweaks, then try again.
docker run -e 'API_KEY=__PASTE_YOUR_API_KEY__' -it onpremnet/agent
Run as a daemon
docker run -e 'API_KEY=__PASTE_YOUR_API_KEY__' -d onpremnet/agent
Kubernetes
Run as a DaemonSet on every node
Create the following file, using your API Key:
# daemonset.yaml
apiVersion: apps/v1
kind: DaemonSet
metadata:
  name: on-prem-agent
  #namespace: default
  labels:
    app: on-prem-agent
spec:
  selector:
    matchLabels:
      name: on-prem-agent
  template:
    metadata:
      labels:
        app: on-prem-agent
    spec:
      tolerations:
      # this toleration is to have the daemonset runnable on master nodes
      # remove it if your masters can't run pods
      - key: node-role.kubernetes.io/master
        effect: NoSchedule
      containers:
      - name:  on-prem-agent
        image: onpremnet/agent:latest
        env:
        - name: API_KEY
          value: __PASTE_YOUR_API_KEY__
        resources:
          limits:
            memory: 100Mi
          requests:
            cpu: 100m
            memory: 200Mi
      terminationGracePeriodSeconds: 30
And then apply it to your cluster:
kubectl apply -f daemonset.yaml
Getting Started with the Agent
Provision an API Key
Next, use our cloud console to provision an API Key, which the agent will use to authenticate with the API service.
Configure agent with your API Key
Edit the agent config file to set your api key. The agent will automatically detect when you save a change to this file (much like kubelet if you're familiar with Kubernetes), and then a full startup will follow.
$ sudo vi /etc/on-prem/agent.yml
...
api_key: c1h0....6vlg
Monitor agent log
To see what the agent is doing, you can monitor its log as follows. Also, you can enable the "debug: true" entry in the config file to increase the logging verbosity.
$ sudo journalctl -u on-prem-agent -f
May 04 16:50:22 c002-n1 systemd[1]: Started On-Prem Agent.
May 01 16:50:22 c002-n1 on-prem-agent[675]: [INFO on_prem_agent] On Prem Agent 2.6.0
May 01 16:50:22 c002-n1 on-prem-agent[675]: [INFO on_prem_agent::configdb::redb] Opened config db /var/lib/on-prem/agent-config.redb
May 01 16:50:26 c002-n1 on-prem-agent[675]: [INFO on_prem_agent::datadb::sled] Opened data db /var/lib/on-prem/agent-data.db
May 01 16:50:26 c002-n1 on-prem-agent[675]: [INFO on_prem_agent] Connected to https://api.on-prem.net
Customize logging
Logging can be customized by setting the RUST_LOG env var like this:
$ RUST_LOG=on_prem=debug on-prem-agent
If you installed the agent via its Debian APT package, environment variables would be customized at
/etc/systemd/system/on-prem-agent.service.d/env.conf as follows:
[Service]
Environment=RUST_LOG=on_prem=debug
Embedded Modules
The following modules are embedded within the On Prem Agent, as either a statically linked Rust-native implementation, or a Lua binding to Rust-native code.
This makes it possible to deploy Lua-based Lambdas and their Controllers over the air that make use of latency-sensitive or security-sensitive modules for interacting with IoT busses or edge network endpoints.
Embedded Lua Modules
The following Lua modules are embedded in the On Prem agent:
| Module | Compute Kernel | LuaRocks Comparable API Reference | Features |
|---|---|---|---|
| arete-sdk | mlua-arete-sdk (Rust) | Control Plane for Smart Buildings | |
| crc16 | mlua-crc16 (Rust) | luacrc16 | Checksums |
| inspect | (pure Lua) | inspect | Stringify a Lua variable while debugging |
| json | mlua-json (Rust) | lua-cjson, lunajson | JSON serde support |
| periphery | mlua-periphery (Rust) | lua-periphery | Peripheral I/O |
| redis | (pure Lua) | redis-lua | LuaSocket based Redis client |
| socket | mlua-socket (Rust) | LuaSocket | Networking |
| xid | mlua-xid (Rust) | Work with XIDs |
CLI
The CLI provides convenient access to the On Prem control plane (API service), and includes typical CLI conveniences such as caching of credentials.
CLI Installation
Cargo
If you're a Rust developer, you can install the CLI directly from crates.io with:
$ cargo install on-prem-cli
Debian
Installation on Debian based operating systems, which includes Raspberry Pi OS and Ubuntu, involves the following steps:
- Register our APT repository's public key
- Register our APT repository
- Refresh your packages index
- Install the CLI
wget -qO - https://apt.onprem.net/public.key | sudo tee /etc/apt/trusted.gpg.d/onprem.asc
VERSION_CODENAME=`grep "VERSION_CODENAME=" /etc/os-release |awk -F= {' print $2'}|sed s/\"//g`
echo "deb https://apt.onprem.net/ ${VERSION_CODENAME} main" | sudo tee /etc/apt/sources.list.d/onprem.list
sudo apt-get update
sudo apt-get -y install onprem-cli
Docker
On Prem Docker images are multi-platform images that will automatically provide you with an image compatible with your current hardware architecture.
$ docker pull onpremnet/cli
Run Interactively
$ docker run -it onpremnet/cli --help

USAGE:
onprem [OPTIONS] <SUBCOMMAND>

FLAGS:
-h, --help       Prints help information
-V, --version    Prints version information

OPTIONS:
--api-key <api-key>    API Key used to authorize requests
--api-url <api-url>    Customize the API URL

SUBCOMMANDS:
help           Prints this message or the help of the given subcommand(s)
import
login
logout
How to provide authorization
$ docker run -it onpremnet/cli --api-key __REDACTED__ ...command...
CLI Usage
Getting Help
$ onprem

USAGE:
onprem [OPTIONS] <SUBCOMMAND>

FLAGS:
-h, --help       Prints help information
-V, --version    Prints version information

OPTIONS:
--api-key <api-key>    API Key used to authorize requests
--api-url <api-url>    Customize the API URL

SUBCOMMANDS:
help           Prints this message or the help of the given subcommand(s)
apply
get
list
login
logout
...
Commands
Logging In
Use the On Prem Console to provision an API Key, which the CLI can use to authenticate with the API service.
$ onprem login --api-key __REDACTED__
Logged in. Greetings David Rauschenbach!
API Key written to ~/.on-prem/config
Apply Command
The apply command focuses on uploading records that are defined locally in JSON or YAML files, and
synchronizing them to the control plane. This enables bootstrapping of the control plane using GitOps.
With this in mind, operations focus on idempotency, so that running any given operation a 2nd time is
harmless and/or just back-fills or resumes where a prior attempt might have left off.
Run Curl
The curl command offers a curl-compatible CLI interface. Operations are performed on remote agents.
graph LR;

cli --> control_plane;
control_plane <-- tunnel --> agent;

subgraph user_edge[User Edge]
cli[CLI];
end

subgraph cloud[Cloud <small>api.on-prem.net</small>]
control_plane[Control Plane];
end

subgraph device_edge[Device Edge]
agent[Agent];
end
Download a file
$ onprem curl --device cibiquh32ckn0os7791g --fail -O https://apt.onprem.net/public.key
File written to "public.key"
Get a single record
The get command provides read access to a single record. Type the get command without any additional parameters
for the comprehensive list:
$ onprem get

Usage: onprem get <COMMAND>

Commands:
  api-key
  device
  ...
Output Formats
Supported output formats include [arrow, json, markdown, ps, and wide]. The ps and wide
format definitions are borrowed from
kubectl.
Examples
Get a device
$ onprem get device c6uuol7qrh9u4hh2bo60

┌──────────────────────┬─────────┬──────────────┬─────────────┬───────────────────────────────────┬─────────────────┬─────────┐
│ id                   ┆ name    ┆ manufacturer ┆ model       ┆ uuid                              ┆ lastIpAddr      ┆ tainted │
│ ---                  ┆ ---     ┆ ---          ┆ ---         ┆ ---                               ┆ ---             ┆ ---     │
│ str                  ┆ str     ┆ str          ┆ str         ┆ str                               ┆ str             ┆ bool    │
╞══════════════════════╪═════════╪══════════════╪═════════════╪═══════════════════════════════════╪═════════════════╪═════════╡
│ chai28932ckjgou9an3g ┆ c006-n2 ┆ NVIDIA       ┆ Jetson Nano ┆ 8ed6b72b-9056-5f3e-8ef4-9a1e537d… ┆ 192.168.241.162 ┆ false   │
└──────────────────────┴─────────┴──────────────┴─────────────┴───────────────────────────────────┴─────────────────┴─────────┘
Get a device as JSON
$ onprem get device c6uuol7qrh9u4hh2bo60 -o json > mydevice.json
Get a device config bundle
If you are going to embed the On Prem Agent into an embedded Linux firmware, you can get the agent to boot from a static device config bundle.
Device config bundles are tar archives containing a device_config.pb Protobuf snapshot of metadata,
plus a files/ directory containing assets such as lambda scripts, model files, or WASM modules.
To download a device config, first find one to focus on:
$ onprem list devices
┌──────────────────────┬─────────────┬──────────────┬────────────────┬─────────────────────────────────┐
│ id                   ┆ name        ┆ manufacturer ┆ model          ┆ uuid                            │
│ ---                  ┆ ---         ┆ ---          ┆ ---            ┆ ---                             │
│ str                  ┆ str         ┆ str          ┆ str            ┆ str                             │
╞══════════════════════╪═════════════╪══════════════╪════════════════╪═════════════════════════════════╡
│ d2u94urm3mk8evm350ug ┆ MacBook Pro ┆ Apple Inc.   ┆ MacBookPro18,2 ┆ DDC1AFED-1FA7-5445-AD6A-016B1F… │
└──────────────────────┴─────────────┴──────────────┴────────────────┴─────────────────────────────────┘
Then download it:
$ onprem get device-config d2u94urm3mk8evm350ug -o my-device-config.tar
Device config downloaded to my-device-config.tar

$ ls -al *.tar
-rw-r--r--  1 davidr  staff  2048 Feb 27 13:36 my-device-config.tar
Then to boot the Agent from the bundle, configure it as follows:
$ vi /etc/on-prem/agent.yml
...
device_config_path: /path-to/my-device-config.tar
Detect I²C Devices
The i2cdetect command asks the On Prem Agent running on a remote device to discover information about its I²C bus.
The agent performs this operation directly using its embedded I²C bus support, preventing operators from having to install
i2c-tools on the target device.
graph LR;

cli --> control_plane;
control_plane <-- tunnel --> agent;

subgraph user_edge[User Edge]
cli[CLI];
end

subgraph cloud[Cloud <small>api.on-prem.net</small>]
control_plane[Control Plane];
end

subgraph device_edge[Device Edge]
agent[Agent];
end
List Components
This example is run against a Raspberry Pi carrying an Argon 40 Fan HAT.
$ onprem i2cdetect --device cibiquh32ckn0os7791g -y 1

     0  1  2  3  4  5  6  7  8  9  a  b  c  d  e  f
00:          -- -- -- -- -- -- -- -- -- -- -- -- --
10: -- -- -- -- -- -- -- -- -- -- 1a -- -- -- -- --
20: -- -- -- -- -- -- -- -- -- -- -- -- -- -- -- --
30: -- -- -- -- -- -- -- -- -- -- -- -- -- -- -- --
40: -- -- -- -- -- -- -- -- -- -- -- -- -- -- -- --
50: -- -- -- -- -- -- -- -- -- -- -- -- -- -- -- --
60: -- -- -- -- -- -- -- -- -- -- -- -- -- -- -- --
70: -- -- -- -- -- -- -- --
List multiple records
The list command provides read access to multiple records. Type the list command without any additional parameters
for the comprehensive list:
$ onprem list

Usage: onprem list <COMMAND>

Commands:
  api-keys
  devices
  lambdas
  ...
Output Formats
Supported output formats include [arrow, json, markdown, ps, and wide]. The ps and wide
format definitions are borrowed from
kubectl.
Examples
Get devices
$ onprem get devices

┌──────────────────────┬───────────────┬──────────────┬─────────────┬──────────┬───────────────────────────────────┐
│ id                   ┆ name          ┆ manufacturer ┆ model       ┆ assetTag ┆ uuid                              │
│ ---                  ┆ ---           ┆ ---          ┆ ---         ┆ ---      ┆ ---                               │
│ str                  ┆ str           ┆ str          ┆ str         ┆ str      ┆ str                               │
╞══════════════════════╪═══════════════╪══════════════╪═════════════╪══════════╪═══════════════════════════════════╡
│ c6uso9fqrh9u4hh2bnng ┆ c003-n4       ┆ Raspberry Pi ┆ 4B Rev 1.4  ┆ def      ┆ e3f42058-9100-5b9b-ba4e-0b81f98f… │
│ c6ut2ffqrh9u4hh2bnqg ┆ c003-n1       ┆ Raspberry Pi ┆ 4B Rev 1.4  ┆ null     ┆ 02da31b3-6f0e-5558-bf9f-930b7ed0… │
│ cft7kep32ckrvnbjkt7g ┆ c003-n3       ┆ Raspberry Pi ┆ 4B Rev 1.2  ┆ null     ┆ 0c9af28b-bc4f-571f-9c7a-5240f475… │
│ ch2ql7p32ckj9ndqd200 ┆ c006-n1       ┆ NVIDIA       ┆ Jetson Nano ┆ null     ┆ 185b8d7c-5c4a-5f63-86d9-d80bbf72… │
│ chai28932ckjgou9an3g ┆ c006-n2       ┆ NVIDIA       ┆ Jetson Nano ┆ null     ┆ 8ed6b72b-9056-5f3e-8ef4-9a1e537d… │
│ ci2fabp32ckvhk1g9qe0 ┆ bitscope-0    ┆ Raspberry Pi ┆ 4B Rev 1.4  ┆ null     ┆ 070b9dbf-437a-59e2-b84d-bcabaa3d… │
└──────────────────────┴───────────────┴──────────────┴─────────────┴──────────┴───────────────────────────────────┘
Get devices in Arrow Format
$ onprem get devices -o arrow > mydevices.arrow
Run a lambda
The run lambda command invokes an existing lambda. Lambdas run on a remote device where the On Prem Agent is running.
You may provide a --device option to specify where the lambda is run.
Note that manually invoking a lambda on a device requires connectivity, and might be something you're only able to do during the factory burn-in phase of your project. In air-gapped environments, lambdas can work on high-throughput low-latency signals without any need of network connectivity.
Running on a device
graph LR;

cli --> control_plane;
control_plane <-- tunnel --> agent;
agent --> lambda_runtime;

subgraph user_edge[User Edge]
cli[CLI];
end

subgraph cloud[Cloud: api.on-prem.net]
control_plane[Control Plane];
end

subgraph device_edge[Device Edge]
agent[Agent];
lambda_runtime[Lambda Runtime];
end
Register the lambda
# mylambda.yaml
id: abcd
name: example
description: >
  A simple example that performs a transformation on the input event.
scriptContentType: Lua
script: >
  local M = {}

  function M.handler(event, context)
    local retval = event
    if event['a'] ~= nil then
      retval['d'] = event['a']+1
    end
    return retval
  end

  return M
$ onprem import lambdas mylambda.yaml
Run it
$ onprem run lambda abcd --device ci2fabp32ckvhk1g9qe0 --event '{"a":123,"b":true,"c":"dog"}'
{"a":123,"b":true,"c":"dog","d":124}
Lambdas
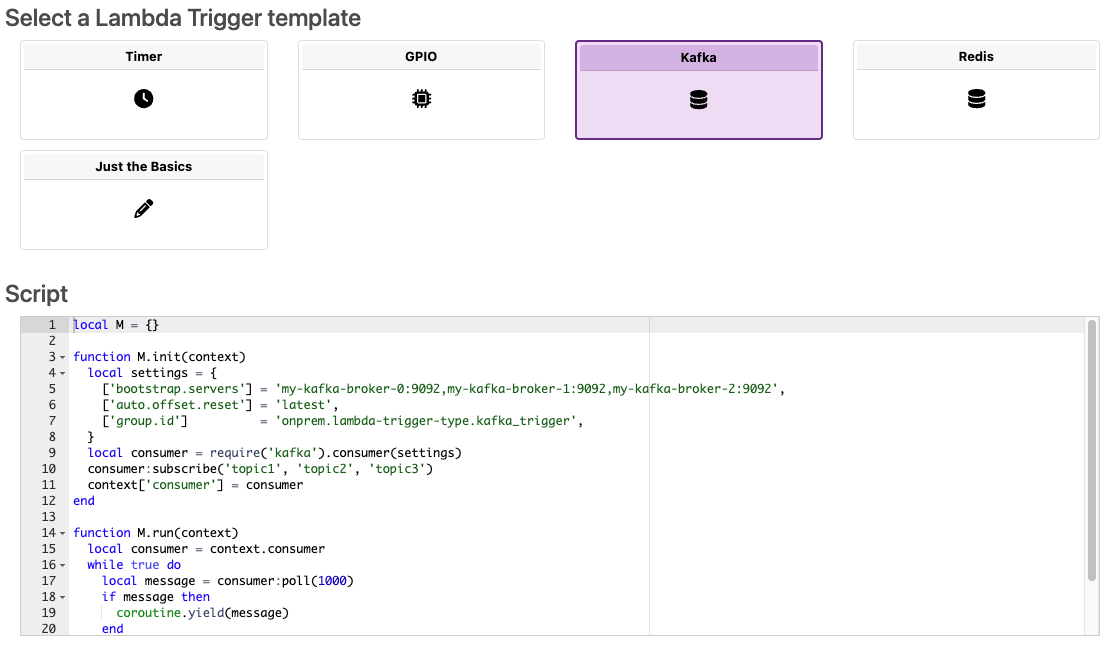
Lambdas provide a way to run custom code in a remote edge environment. These lambdas can either be triggered manually, or they can be configured to be triggered by certain events which might include:
- IoT Bus events such as GPIO edge triggers
- Network events such as Kafka or Redis subscription events
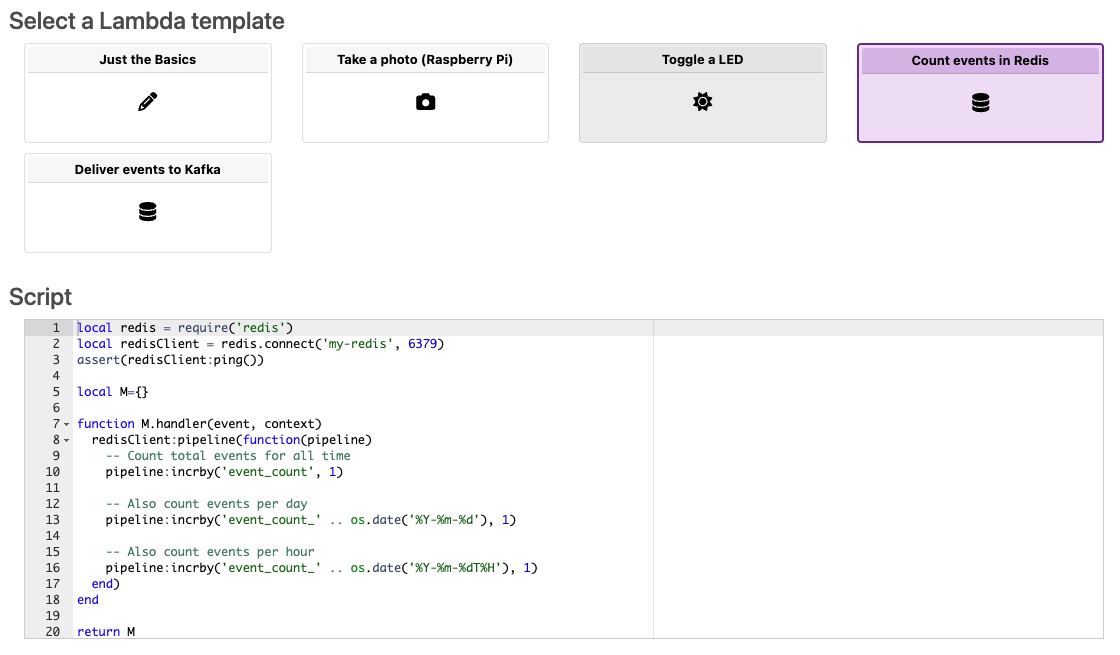
When creating a new Lambda in the web console, a number of templates are offered:
Lambdas are written in Lua, JavaScript, or any language that compiles to WASI-compliant WASM. This limited set of supported language runtimes ensures over-the-air deployability and sandbox security for edge logic, without the need for Docker or VMs, making the On Prem Agent suitable for use on resource-constrained operator-less industrial edge devices.
Lambdas that are written in Lua or JavaScript can bundle WASM support libraries, and interact with them using a language binding for Wasmer that is built into the edge agent. The Lua or JavaScript code would typically orchestrate native low-level modules that are either built into the agent (to support networking, local storage, and IoT busses), or that are provided by WASM modules built by you and deployed to the agent alongside the Lambda.
Running on a device
Lambdas are deployed as part of an agent's sealed configuration bundle, and are then able to run autonomously to perform workloads such as inference, ETL, or control functions, all without the need for cloud connectivity.
graph LR;

agent --> lambdas;
lambdas --> databases;
lambdas --> services;
lambdas --> busses;

subgraph device_edge[Device Edge]
agent;
databases[(Edge Databases)];
services[Network Services];
busses[IoT Busses];
end

subgraph agent[Agent]
lambdas[Lambdas];
end
Structure of a Lambda
Lua
Lambdas written in Lua are AWS Lambda compatible module tables that
must include, at a minimum, a handler(event, context) function.
local inspect = require('inspect')
local M = {}

function M.handler(event, context)
  print('event has fired: %s', inspect(event))
  return {
    firstName = 'John',
    lastName = 'Doe',
    age = 23,
  }
end

return M
JavaScript
Lambdas written in JavaScript are AWS Lambda compatible
JavaScript modules that must export a handler(event, context) function.
export const handler = async(event, context) => {
  console.log('event has fired:', event);
  return {
    firstName: 'John',
    lastName: 'Doe',
    age: 23,
  };
};
WASI-compliant WASM
Lambdas written in some language that compiles to WASM are
WebAssembly System Interface (WASI) compatible
WASM modules. They are delivered an event[data] field via stdin, and are expected to return an
event[data] field via stdout. Additionally, they are delivered other event fields as program
arguments. Here, a Rust based WASI lambda is shown converting a jpeg image to grayscale:
use image::ImageFormat;
use std::io::{self, Cursor, Read, Write};

fn main() -> anyhow::Result<()> {
    // Read
    let mut buf = Vec::new();
    io::stdin().read_to_end(&mut buf)?;

    // Convert
    let img = image::load_from_memory(&buf)?;
    let transformed = img.grayscale();

    // Serialize to a buffer
    let mut buf: Vec<u8> = Vec::new();
    transformed.write_to(&mut Cursor::new(&mut buf), ImageFormat::Jpeg)?;

    // Write
    io::stdout().write_all(&buf)?;
    io::stdout().flush()?;
    Ok(())
}
Lua Example
In this example, a Lambda is written to take a picture using a Raspberry Pi camera.
While testing, Lambdas can be run manually via the CLI from a workstation at the developer edge.
$ onprem run lambda clv3b1c3v1vsk4qabftg --event-data-to-file out.jpeg
Wrote event[data] to out.jpeg (940.9K)
Controllers
Controllers provide a way to generate events that Lambdas can respond to. Every controller is expected to run a control loop, and is given a dedicated thread in the agent.
When creating a new controller in the web console, a number of templates are offered:
Structure of a Controller
A controller script contains an initialization function which can be used to perform resource allocations. A context object is made available and can be used for temporary storage.
Then a controller provides a run function, which should emit events that will be delivered to Lambdas.
local redis = require('redis')
local socket = require('socket')
local M = {}

function M.init(context, params)
  local redisClient = redis.connect('my-redis', 6379)
  assert(redisClient:ping())
  context['redisClient'] = redisClient
end

function M.run(context)
  local redisClient = context.redisClient
  local channels = {'foo', 'bar'}
  for msg, abort in redisClient:pubsub({subscribe=channels}) do
    local event = {
      timestamp = socket.gettime(),
      msg = msg
    }
    coroutine.yield(event)
  end
end

return M
Cookbook
Add One
The simplest possible lambda takes a numeric input, and adds one to it.
Initial Provisioning
graph LR;

subgraph user_edge[User Edge]
cli[CLI];
end

subgraph cloud[Cloud <small>api.on-prem.net</small>]
control_plane[Control Plane];
end

subgraph device_edge[Device Edge]
agent[Agent];
end

cli --> control_plane;
control_plane <-- tunnel --> agent;
Subsequent Operation
graph LR;

subgraph user_edge[User Edge]
cli[CLI];
end

subgraph device_edge[Device Edge]
agent[Agent];
end

subgraph cloud[Cloud <small>api.on-prem.net</small>]
control_plane[Control Plane];
end

cli -- input --> control_plane;
cli <-- output --- control_plane;

control_plane -- input --> agent;
control_plane <-- output --- agent;
Lua
$ onprem generate xid
d3238k9caq0nmbcvrc30
# add_one.yaml
id: d3238k9caq0nmbcvrc30
kind: Lambda
name: add_one
description: >
  Add 1.
runAt:
  device:
    deviceId: ci2fabp32ckvhk1g9qe0
scriptContentType: Lua
script: >
  local M={}

  function M.handler(event)
    return event + 1
  end

  return M
$ onprem apply add_one.yaml
JavaScript
# add_one.yaml
id: d3238k9caq0nmbcvrc30
kind: Lambda
name: add_one
description: >
  Add 1.
runAt:
  device:
    deviceId: ci2fabp32ckvhk1g9qe0
scriptContentType: JavaScript
script: >
  export const handler = async(event, context) => {
    return event + 1;
  };
$ onprem apply add_one.yaml
Run it:
$ onprem run lambda d3238k9caq0nmbcvrc30 --event 123
124.0
Lua + WASM
See the Call WASM example.
Periodic
This example demonstrates defining a custom controller that can periodically trigger Lambdas.
Initial Provisioning
graph LR;

cli --> control_plane;
console --> control_plane;
control_plane <-- tunnel --> agent;

subgraph user_edge[User Edge]
cli[CLI];
console[Console];
end

subgraph cloud[Cloud <small>api.on-prem.net</small>]
control_plane[Control Plane];
end

subgraph device_edge[Device Edge]
agent[Agent];
end
Subsequent Autonomous Edge Operation
graph LR;

agent --> trigger[Controller];
trigger --> lambda1;
trigger --> lambda2;
trigger --> lambda3;

subgraph device_edge[Device Edge]
agent;
end

subgraph agent[Agent]
trigger;
lambda1[Lambda 1];
lambda2[Lambda 2];
lambda3[Lambda 3];
end
Define the Controller
$ onprem generate xid
cj7br83erad4ipi8nb4g
# my_periodic_controller.yaml
id: cj7br83erad4ipi8nb4g
kind: Controller
name: periodic_controller
description: >
  Periodically trigger lambdas.
scriptContentType: Lua
script: >
  local socket = require('socket')

  local M = {}

  function M.init(context, params)
  end

  function M.run(context)
    while true do
      local event = {
        timestamp = socket.gettime()
      }
      coroutine.yield(event)
      socket.sleep(0.5) -- seep for 1/2 second
    end
  end

  return M
Upload it to the control plane
$ onprem apply my_periodic_controller.yaml
It will now show up in the cloud console.
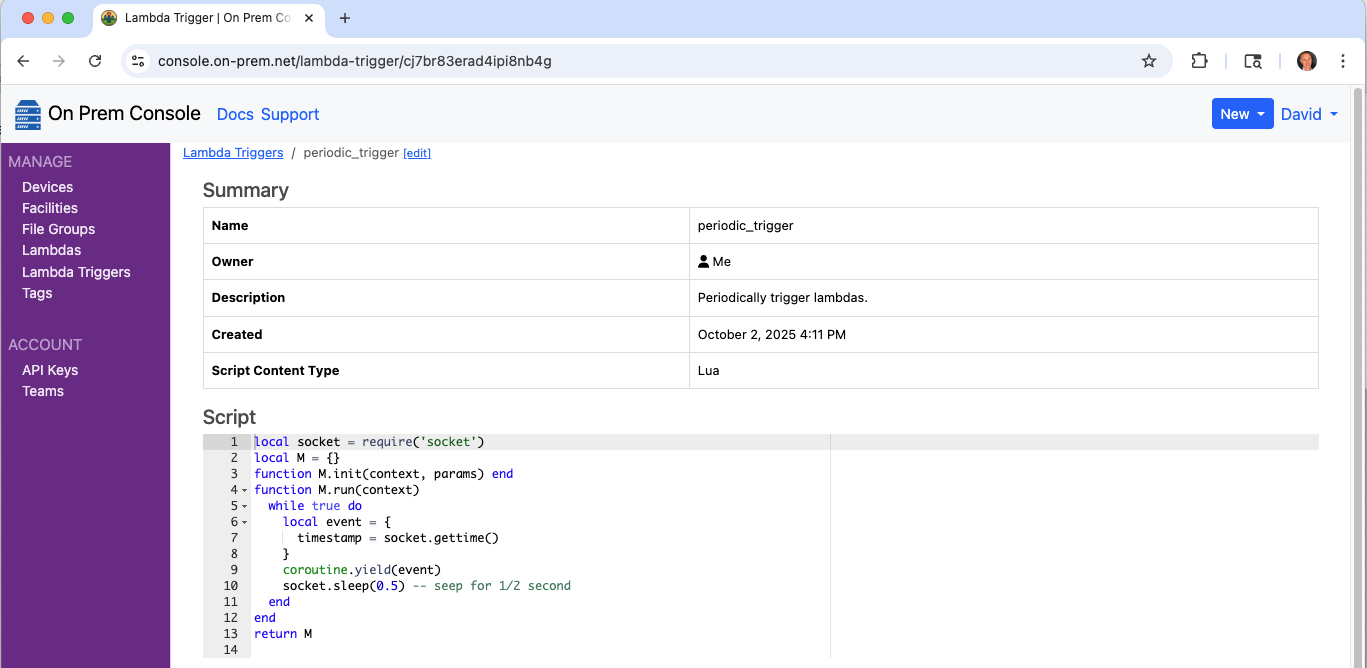
And it will also now show up as one of the trigger choices when editing a Lambda.

Redis
This example demonstrates defining a custom controller that subscribes to a Redis pub+sub channel. It then demonstrates a Lambda that responds.
Initial Provisioning
graph LR;

cli --> control_plane;
console --> control_plane;
control_plane <-- tunnel --> agent;

subgraph user_edge[User Edge]
cli[CLI];
console[Console];
end

subgraph cloud[Cloud <small>api.on-prem.net</small>]
control_plane[Control Plane];
end

subgraph device_edge[Device Edge]
agent[Agent];
end
Subsequent Autonomous Edge Operation
graph TB;

agent --> trigger[Controller];
trigger --> lambda1;
trigger --> lambda2;
trigger --> lambda3;
redis -- subscribe --> trigger;

subgraph device_edge[Device Edge]
agent;
redis[(Redis)]
end

subgraph agent[Agent]
trigger;
lambda1[Lambda 1];
lambda2[Lambda 2];
lambda3[Lambda 3];
end
Define the Controller
$ onprem generate xid
ck86ttgdr07e6c71dnjg
# my_redis_subscribe_controller.yaml
id: ck86ttgdr07e6c71dnjg
kind: Controller
name: my_redis_subscribe_controller
description: >
  Trigger lambdas when a Redis pub+sub event fires.
scriptContentType: Lua
script: >
  local redis = require('redis')
  local socket = require('socket')

  local M = {}

  function M.init(context)
    local redisClient = redis.connect('my-redis', 6379)
    assert(redisClient:ping())
    context['redisClient'] = redisClient
  end

  function M.run(context)
    local redisClient = context.redisClient
    local channels = {'foo', 'bar'}
    for msg, abort in redisClient:pubsub({subscribe=channels}) do
      local event = {
        timestamp = socket.gettime(),
        msg = msg
      }
      coroutine.yield(event)
    end
  end

  return M
Upload it to the control plane
$ onprem apply ./my_redis_subscribe_controller.yaml
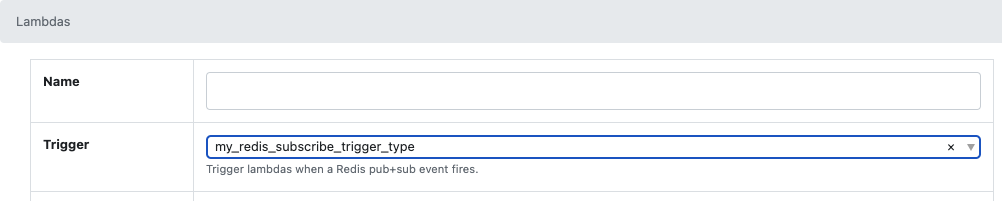
It will now show up in the cloud console.
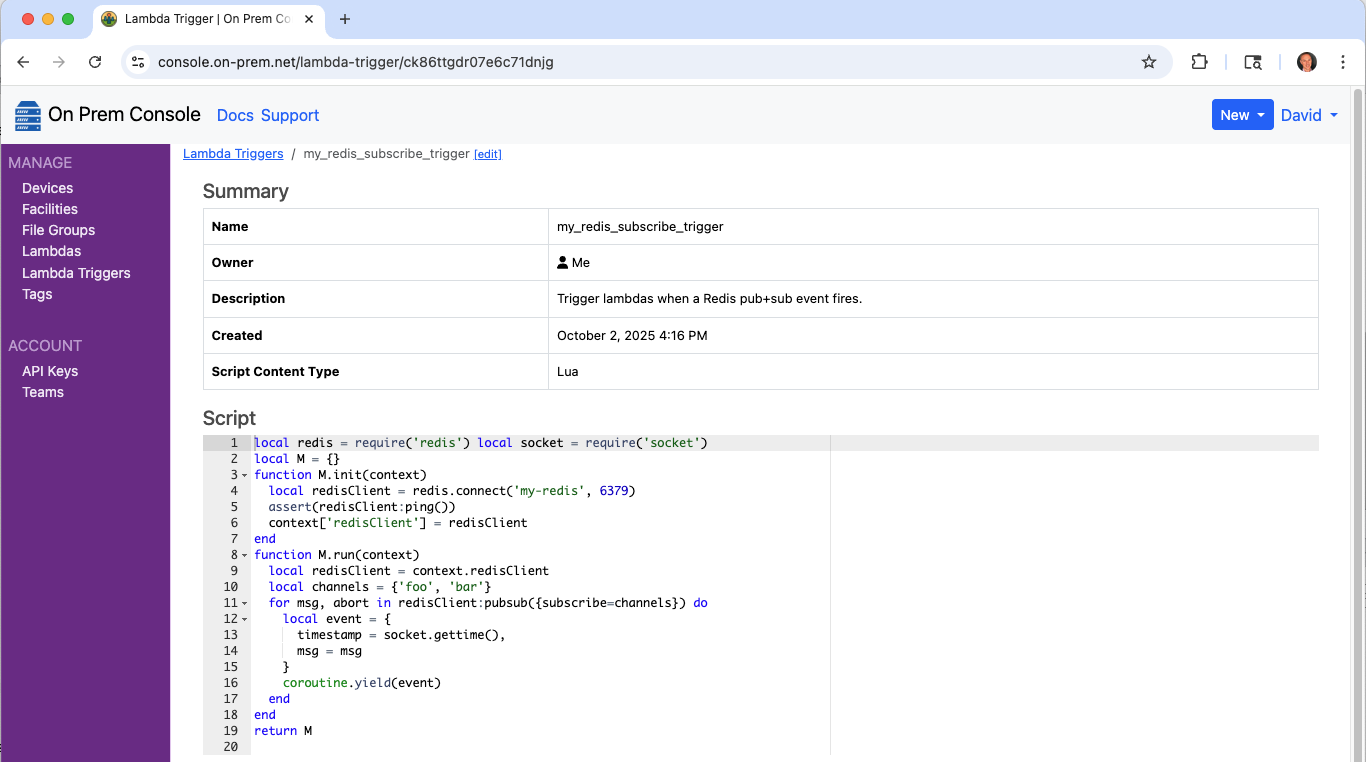
And it will also now show up as one of the trigger choices when editing a Lambda.
Configure a Lambda to respond
$ onprem generate xid
ck871o8dr07ebbbn2h30
# respond_to_redis_events.yaml
id: ck871o8dr07ebbbn2h30
kind: Lambda
name: respond_to_redis_events
description: >
  Respond to events received from Redis pub+sub channel.
runAt:
  device:
    deviceId: ci2fabp32ckvhk1g9qe0
triggerId: ck86ttgdr07e6c71dnjg
scriptContentType: Lua
script: >
  local M={}
  function M.handler(event, context)
    -- TODO do something with the event here
    return event
  end
  return M
$ onprem apply respond_to_redis_events.yaml
Manually Trigger
$ redis-cli publish foo 123
Include model files
A lambda may define associated files that will be deployed to the agent alongside the lambda. Files may be things like machine learning or tensor models.
Register the lambda
lambda_that_includes_model_files.yaml
models/
  currencies.csv
  timezones.csv
  keras-tract-tf2-example.onnx
$ onprem generate xid
cmpsf7656a16efdhjrf0
# lambda_that_includes_model_files.yaml
id: cmpsf7656a16efdhjrf0
kind: Lambda
name: lambda_that_includes_model_files.yaml
description: >
  A lambda that uses associated model files.
runAt:
  device:
    deviceId: ci2fabp32ckvhk1g9qe0
fileIds:
  - "@models/currencies.csv"
  - "@models/timezones.csv"
  - "@models/keras-tract-tf2-example.onnx"
scriptContentType: Lua
script: >
  local M={}

  function M.handler(event, context)
    local path = context.pathForFilename('currencies.csv')
    local currencies = io.open(path, 'r')
  end

  return M
$ onprem apply lambda_that_includes_model_files.yaml
Cookbook :: Raspberry Pi
- Arete Control Plane for Smart Buildings
- GPIO Edge Trigger
- Power Management with a BitScope Cluster Blade
- Read SixFab UPS HAT Input Voltage via I²C Bus
- Take a Photo
- Take a Photo with Transform
- Take Continuous Photos
- Toggle a LED
Arete Control Plane for Smart Buildings
This example demonstrates use of two Raspberry Pis to simulate two devices within a smart building that make use of the Arete Control Plane to coordinate desired state and actual state.
It reproduces the Arete SDK example called "the switch and the light", by restructuring its flow as Controller control loops and Lambdas.
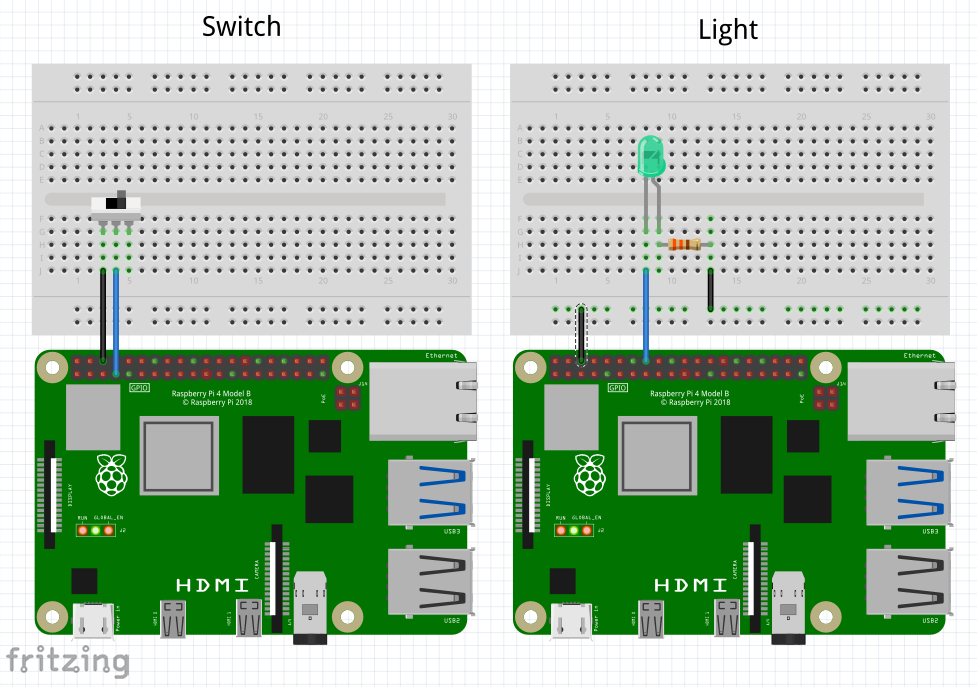
On a 1st node, the On Prem Agent runs "the switch", which consists of:
- a Controller that subscribes to GPIO 04 edge events, and
- a Lambda that translates those events into a new desired state, and publishes it to the Arete control plane.
On a 2nd node, the On Prem Agent runs "the light", which consists of:
- a Controller that subscribes to Arete control plane events containing desired state changes, and
- a Lambda that responds to those desired state change events, and realizes them by setting a GPIO 23 pin, and finally communicating the new actual state back to the Arete Control Plane.
Initial Provisioning
graph LR;

cli --> control_plane;
console --> control_plane;
control_plane <-- tunnel --> agent_1;
control_plane <-- tunnel --> agent_2;

subgraph user_edge[User Edge]
cli[CLI];
console[Console];
end

subgraph cloud[Cloud <small>api.on-prem.net</small>]
control_plane[Control Plane];
end

subgraph device_edge_1[Device Edge]
agent_1[Agent 1];
agent_2[Agent 2];
end
Subsequent Autonomous Edge Operation
graph TB;

switch --> arete_control_plane;
arete_control_plane --> light;

subgraph device_edge[Device Edge]
agent_1;
agent_2;
arete_control_plane;
end

subgraph agent_1[Agent 1]
gpio_04_pin[GPIO 04 pin];
switch[Switch];
gpio_04_pin -- edge trigger --> switch;
end

subgraph agent_2[Agent 2]
gpio_23_pin[GPIO 23 pin];
light[Light];
light --> gpio_23_pin;
end

arete_control_plane[(Arete Control Plane)];
Part 1: The Switch
Define the Controller to detect the GPIO edge triggers
$ onprem generate xid
cj7ca3berad6gieb3rbg
# arete_switch_gpio_controller.yaml
id: cj7ca3berad6gieb3rbg
kind: Controller
name: arete_switch_gpio_controller
description: >
  Detect GPIO edge events, and emit them to a downstream lambda.
scriptContentType: Lua
script: >
  local GPIO = require('periphery.GPIO')

  local M = {}

  function M.init(context)
    -- Configure GPIO 04 pin for input
    local params = {
      path      = '/dev/gpiochip0',
      line      = 4,
      direction = 'in',
      edge      = 'both',
    }
    local pin = GPIO(params)
    context['pin'] = pin
  end

  function M.run(context)
    local pin = context.pin
    while true do
      local event = pin:read_event()
      coroutine.yield(event)
    end
  end

  return M
$ onprem apply ./arete_switch_gpio_controller.yaml
Define the Lambda that will receive the GPIO events, and transmit to Arete
$ onprem generate xid
d322bqpcaq0mr0n3a2bg
# arete_switch.yaml
id: d322bqpcaq0mr0n3a2bg
kind: Lambda
name: arete_switch
description: >
  Respond to GPIO edge events, and transmit as new desired state to the Arete control plane.
triggerId: cj7ca3berad6gieb3rbg
runAt:
  device:
    deviceId: d6mclbipqhcfg04mv0l0 # Raspberry Pi #1
scriptContentType: Lua
script: >
  local NODE_ID = 'ozr9fZbU8i7hMdjEjuTS2o'
  local NODE_NAME = 'On Prem Arete Switch'

  local CONTEXT_ID = 'uRLoYsXEY7nsbs9fRdjM8A'
  local CONTEXT_NAME = 'Building 23, Office 41-B'

  local PADI_LIGHT_PROFILE = 'padi.light'

  local M = {}

  function M.handler(event, context)
    -- Configure Arete context, the first time
    if context.areteContext == nil then
      context['areteContext'] = M.newAreteContext()
    end
    local areteContext = context.areteContext

    -- Transmit new desired state to Arete control plane
    local desiredState = event.edge == 'falling' and '1' or '0'
    local provider = areteContext:provider(PADI_LIGHT_PROFILE)
    provider:put('sOut', desiredState)
  end

  function M.newAreteContext()
    local arete = require('arete-sdk')
    local areteClient = arete.Client:new('wss://dashboard.test.cns.dev:443')
    areteClient:waitForOpen()
    local system = areteClient:system()
    local node = system:node(NODE_ID, NODE_NAME, false)
    local context = node:context(CONTEXT_ID, CONTEXT_NAME)
    return context
  end

  return M
$ onprem apply ./arete_switch.yaml
Part 2: The Light
Define the Controller that will detect changes to desired state
$ onprem generate xid
cj7ca3berad6gieb3rbg
# arete_light_controller.yaml
id: cj7ca3berad6gieb3rbg
kind: Controller
name: arete_light_controller
description: >
  Subscribe to the Arete control plane for the desired state of a light.
scriptContentType: Lua
script: >
  local PADI_LIGHT_PROFILE = 'padi.light'

  local M = {}

  function M.init(context)
    context['areteContext'] = M.newAreteContext()
  end

  function M.run(context)
    local areteContext = context.areteContext
    local consumer = areteContext:consumer(PADI_LIGHT_PROFILE)
    for event, abort in consumer:watch() do
      coroutine.yield(event)
    end
  end

  function M.newAreteContext()
    local arete = require('arete-sdk')

    local NODE_ID = 'onqXVczGoymQkFc3UN6qcM'
    local NODE_NAME = 'On Prem Arete Light'

    local CONTEXT_ID = 'uRLoYsXEY7nsbs9fRdjM8A'
    local CONTEXT_NAME = 'Building 23, Office 41-B'

    local areteClient = arete.Client:new('wss://dashboard.test.cns.dev:443')
    areteClient:waitForOpen()
    local system = areteClient:system()
    local node = system:node(NODE_ID, NODE_NAME)
    local context = node:context(CONTEXT_ID, CONTEXT_NAME)
    return context
  end

  return M
$ onprem apply ./arete_light_controller.yaml
Define the Lambda that will realize the desired state by turning on a light
$ onprem generate xid
d322gs1caq0mvt65gb4g
# arete_light.yaml
id: d322gs1caq0mvt65gb4g
kind: Lambda
name: arete_light
description: >
  Turn on a light.
triggerId: cj7ca3berad6gieb3rbg
runAt:
  device:
    deviceId: d6mclhapqhcfg5ammj1g # Raspberry Pi #2
scriptContentType: Lua
script: >
  local GPIO = require('periphery.GPIO')

  local M = {}

  function M.handler(event, context)
    -- Configure GPIO 23 pin for output, the first time
    if context.pin == nil then
      local params = {
        path      = '/dev/gpiochip0',
        line      = 23,
        direction = 'out',
      }
      local pin = GPIO(params)
      context['pin'] = pin
    end
    local pin = context.pin

    -- Realize the desired state
    local desiredState = event.sState == '1'
    pin:write(desiredState)
  end

  return M
$ onprem apply ./arete_light.yaml
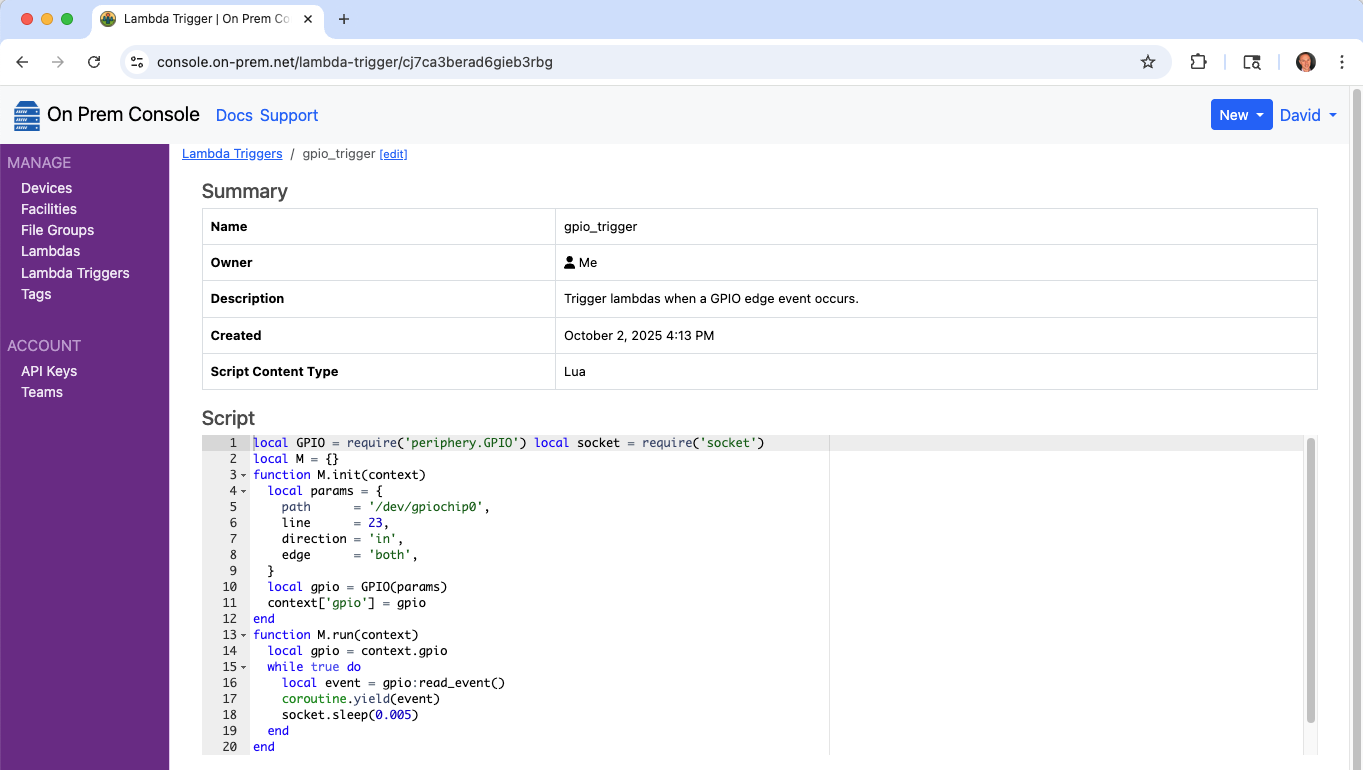
GPIO Edge Trigger
This example demonstrates a custom Controller that subscribes to GPIO edge trigger events via the Linux kernel.
It then demonstrates various Lambdas that respond to it and perform various functions.
Initial Provisioning
graph LR;

cli --> control_plane;
console --> control_plane;
control_plane <-- tunnel --> agent;

subgraph user_edge[User Edge]
cli[CLI];
console[Console];
end

subgraph cloud[Cloud <small>api.on-prem.net</small>]
control_plane[Control Plane];
end

subgraph device_edge[Device Edge]
agent[Agent];
end
Subsequent Autonomous Edge Operation
graph TB;

agent --> trigger[Controller];
pin -- edge trigger --> trigger;
trigger --> lambda1;
trigger --> lambda2;
trigger --> lambda3;

subgraph device_edge[Device Edge]
agent;
pin[GPIO Pin];
end

subgraph agent[Agent]
trigger;
lambda1[Lambda 1];
lambda2[Lambda 2];
lambda3[Lambda 3];
end
Define the Controller
$ onprem generate xid
cj7ca3berad6gieb3rbg
# my_gpio_controller.yaml
id: cj7ca3berad6gieb3rbg
kind: Controller
name: my_gpio_controller
description: >
  Trigger lambdas when a GPIO edge event occurs.
scriptContentType: Lua
script: >
  local GPIO = require('periphery.GPIO')
  local socket = require('socket')

  local M = {}

  function M.init(context)
    local params = {
      path      = '/dev/gpiochip0',
      line      = 23,
      direction = 'in',
      edge      = 'both',
    }
    local gpio = GPIO(params)
    context['gpio'] = gpio
  end

  function M.run(context)
    local gpio = context.gpio
    while true do
      local event = gpio:read_event()
      coroutine.yield(event)
      socket.sleep(0.005)
    end
  end

  return M
The sleep used above is precautionary but unnecessary when performing a blocking call such as
read_event(). Each Controller run loop runs in a dedicated thread, and run loops are
free to peg the CPU of a single core if they want.
Upload it to the control plane
$ onprem apply ./my_gpio_controller.yaml
It will now show up in the cloud console.
And it will also now show up as one of the trigger choices when editing a Lambda.

Lambda Example 1: Configure an LED to follow the GPIO pin
$ onprem generate xid
cj7co6jerad78frcc100
# follow_gpio23_with_led0.yaml
id: cj7co6jerad78frcc100
kind: Lambda
name: follow_gpio_with_led0
description: >
  Follow GPIO pin 23 and display with led0.
runAt:
  device:
    deviceId: ci2fabp32ckvhk1g9qe0
triggerId: cj7ca3berad6gieb3rbg
scriptContentType: Lua
script: >
  local LED = require('periphery.LED')
  local led = LED('led0')

  local M={}
  function M.handler(event, context)
    local newValue = false
    if event.edge == 'rising' then
      newValue = true
    end
    led:write(newValue)
    return {edge=event.edge, timestamp=event.timestamp}
  end
  return M
$ onprem apply ./follow_gpio23_with_led0.yaml
Lambda Example 2: Aggregate the GPIO events in Redis
$ onprem generate xid
clv0p4u56a1fjkem7h9g
# follow_gpio23_and_aggregate_in_redis.yaml
id: clv0p4u56a1fjkem7h9g
kind: Lambda
name: follow_gpio23_and_aggregate_in_redis
description: >
  Follow GPIO pin 23 and aggregate events in Redis.
runAt:
  device:
    deviceId: ci2fabp32ckvhk1g9qe0
triggerId: cj7ca3berad6gieb3rbg
scriptContentType: Lua
script: >
  local redis = require('redis')

  local M={}

  function M.handler(event, context)
    -- Connect the first time
    if context.redisClient == nil then
      local redisClient = redis.connect('my-redis', 6379)
      assert(redisClient:ping())
      context['redisClient'] = redisClient
    end
    local redisClient = context.redisClient

    redisClient:pipeline(function(pipeline)
      -- Count total events for all time
      pipeline:incrby('event_count', 1)

      -- Also count events per day
      pipeline:incrby('event_count_' .. os.date('%Y-%m-%d'), 1)

      -- Also count events per hour
      pipeline:incrby('event_count_' .. os.date('%Y-%m-%dT%H'), 1)
    end)
    return {edge=event.edge, timestamp=event.timestamp}
  end

  return M
$ onprem apply follow_gpio23_and_aggregate_in_redis.yaml
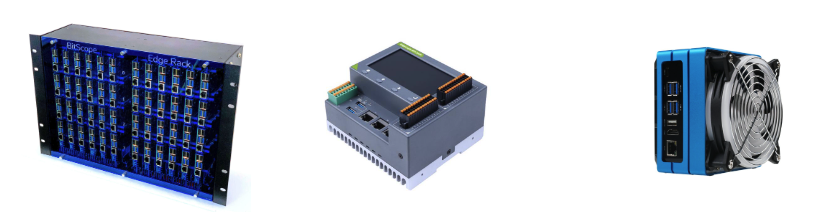
Power Management with a BitScope Cluster Blade
This lambda demonstrates cycling the power of a node mounted on a BitScope Cluster Blade, by sending instructions to the BMC via a serial bus.
The On Prem CLI is used to demonstrate manually triggering the lambda from a remote desktop.
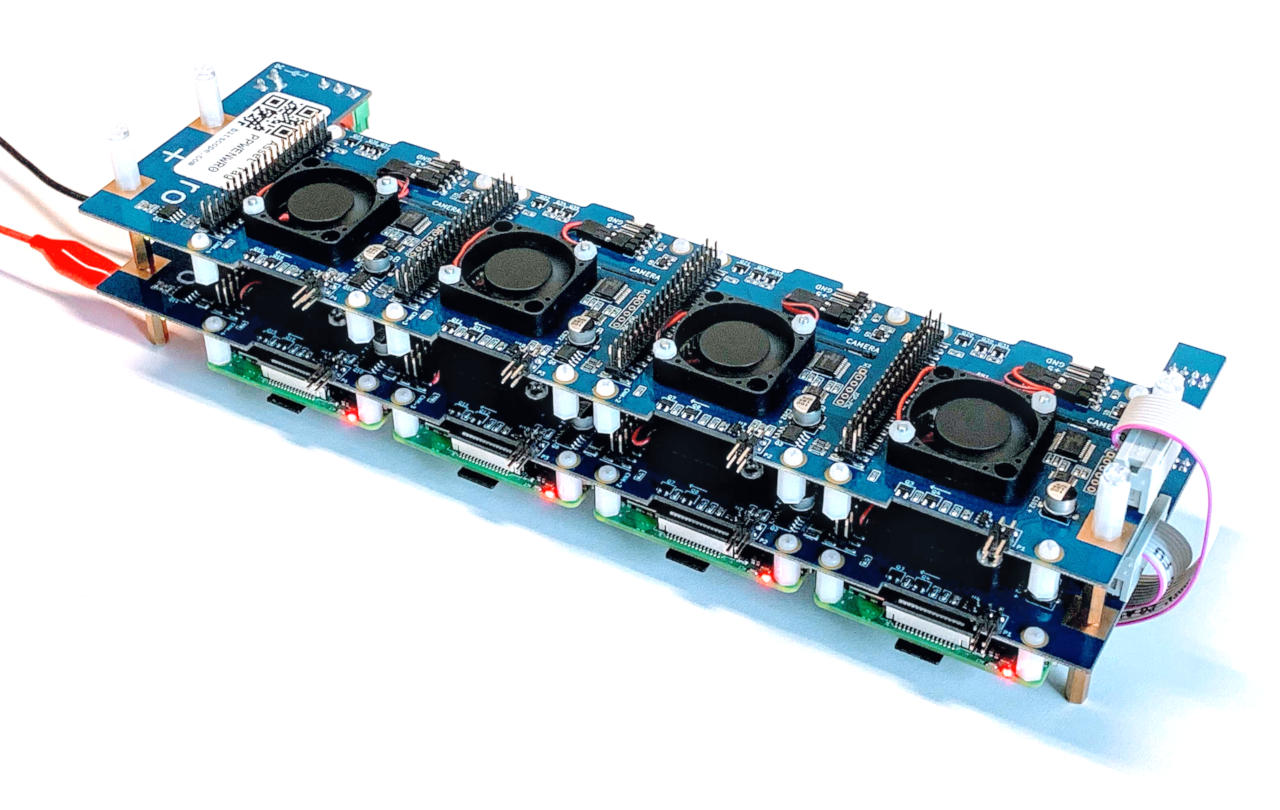
Cycling the power is done using the BMC from a 2nd node. In this diagram, Device 0 is shown being used to manage the power of Devices 1, 2, or 3.
graph LR;

cli --> control_plane;
control_plane <-- tunnel --> agent0;
agent0 --> bmc;
bmc --> device0;
bmc --> device1;
bmc --> device2;
bmc --> device3;

subgraph user_edge[User Edge]
cli[CLI];
end

subgraph cloud[Cloud <small>api.on-prem.net</small>]
control_plane[Control Plane];
end

subgraph device_edge[Device Edge]
blade;
end

subgraph blade[CB04B Cluster Blade]
bmc;
device0;
device1;
device2;
device3;
end

subgraph device0[Device 0, station 124]
agent0[Agent];
end

subgraph device1[Device 1, station 125]
agent1[Agent];
end

subgraph device2[Device 2, station 126]
agent2[Agent];
end

subgraph device3[Device 3, station 127]
agent3[Agent];
end
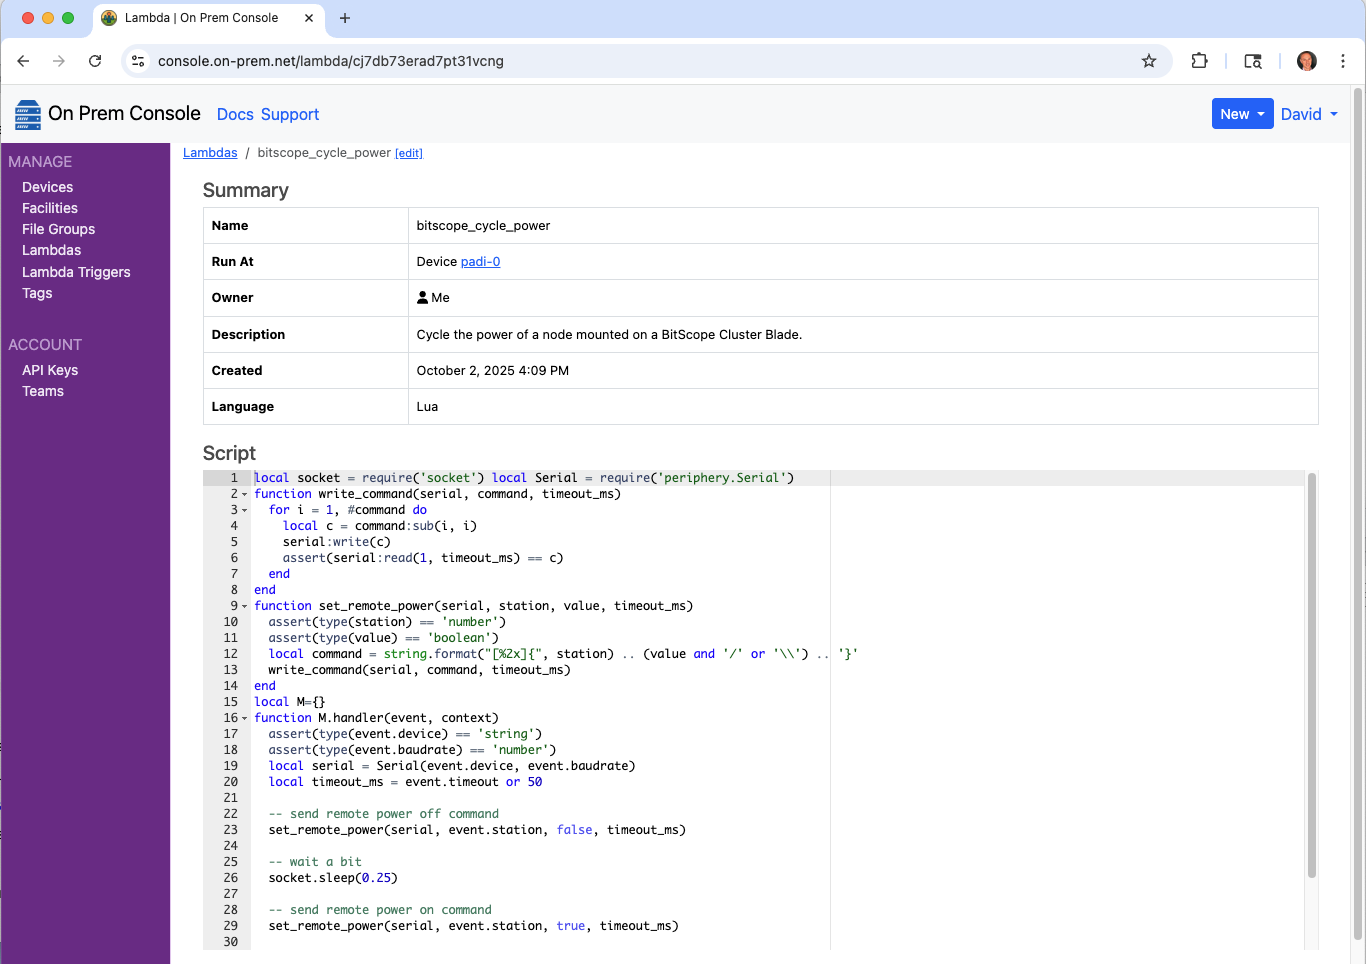
Register the lambda
$ onprem generate xid
cj7db73erad7pt31vcng
# bitscope_cycle_power.yaml
id: cj7db73erad7pt31vcng
kind: Lambda
name: bitscope_cycle_power
description: >
  Cycle the power of a node mounted on a BitScope Cluster Blade.
runAt:
  # Run at Device 0 (station 124)
  device:
    deviceId: ci2fabp32ckvhk1g9qe0
scriptContentType: Lua
script: >
  local socket = require('socket')
  local Serial = require('periphery.Serial')

  function write_command(serial, command, timeout_ms)
    for i = 1, #command do
      local c = command:sub(i, i)
      serial:write(c)
      assert(serial:read(1, timeout_ms) == c)
    end
  end

  function set_remote_power(serial, station, value, timeout_ms)
    assert(type(station) == 'number')
    assert(type(value) == 'boolean')
    local command = string.format("[%2x]{", station) .. (value and '/' or '\\') .. '}'
    write_command(serial, command, timeout_ms)
  end

  local M={}

  function M.handler(event, context)
    assert(type(event.device) == 'string')
    assert(type(event.baudrate) == 'number')
    local serial = Serial(event.device, event.baudrate)
    local timeout_ms = event.timeout or 50

    -- send remote power off command
    set_remote_power(serial, event.station, false, timeout_ms)

    -- wait a bit
    socket.sleep(0.25)

    -- send remote power on command
    set_remote_power(serial, event.station, true, timeout_ms)

    -- respond
    return {station=event.station, ok=true}
  end

  return M
$ onprem apply bitscope_cycle_power.yaml
It will now show up in the cloud console.
Run it
$ onprem run lambda cj7db73erad7pt31vcng --event '{"station":126,"device":"/dev/serial0","baudrate":115200}'
{"station":126,"ok":true}
Read Input Voltage of a SixFab UPS HAT via I²C
This lambda reads the input voltage of a SixFab UPS Hat mounted on a Raspberry Pi.
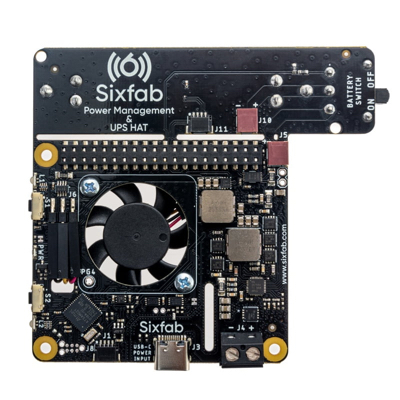
The On Prem CLI is used to demonstrate manually triggering the lambda and taking delivery of the event JSON from a remote desktop.
graph LR;

cli --> control_plane;
control_plane <-- tunnel --> agent;
agent -- i2c --> hat;

subgraph user_edge[User Edge]
cli[CLI];
end

subgraph cloud[Cloud <small>api.on-prem.net</small>]
control_plane[Control Plane];
end

subgraph device_edge[Device Edge]
agent[Agent];
hat[SixFab UPS Fan HAT];
end
Note that manually triggering a lambda is unusual in that it requires device connectivity to the control plane. A more typical scenario is where Lambdas and their Controller's run loops run autonomously at the device edge, regardless of the device's connectivity to the control plane.
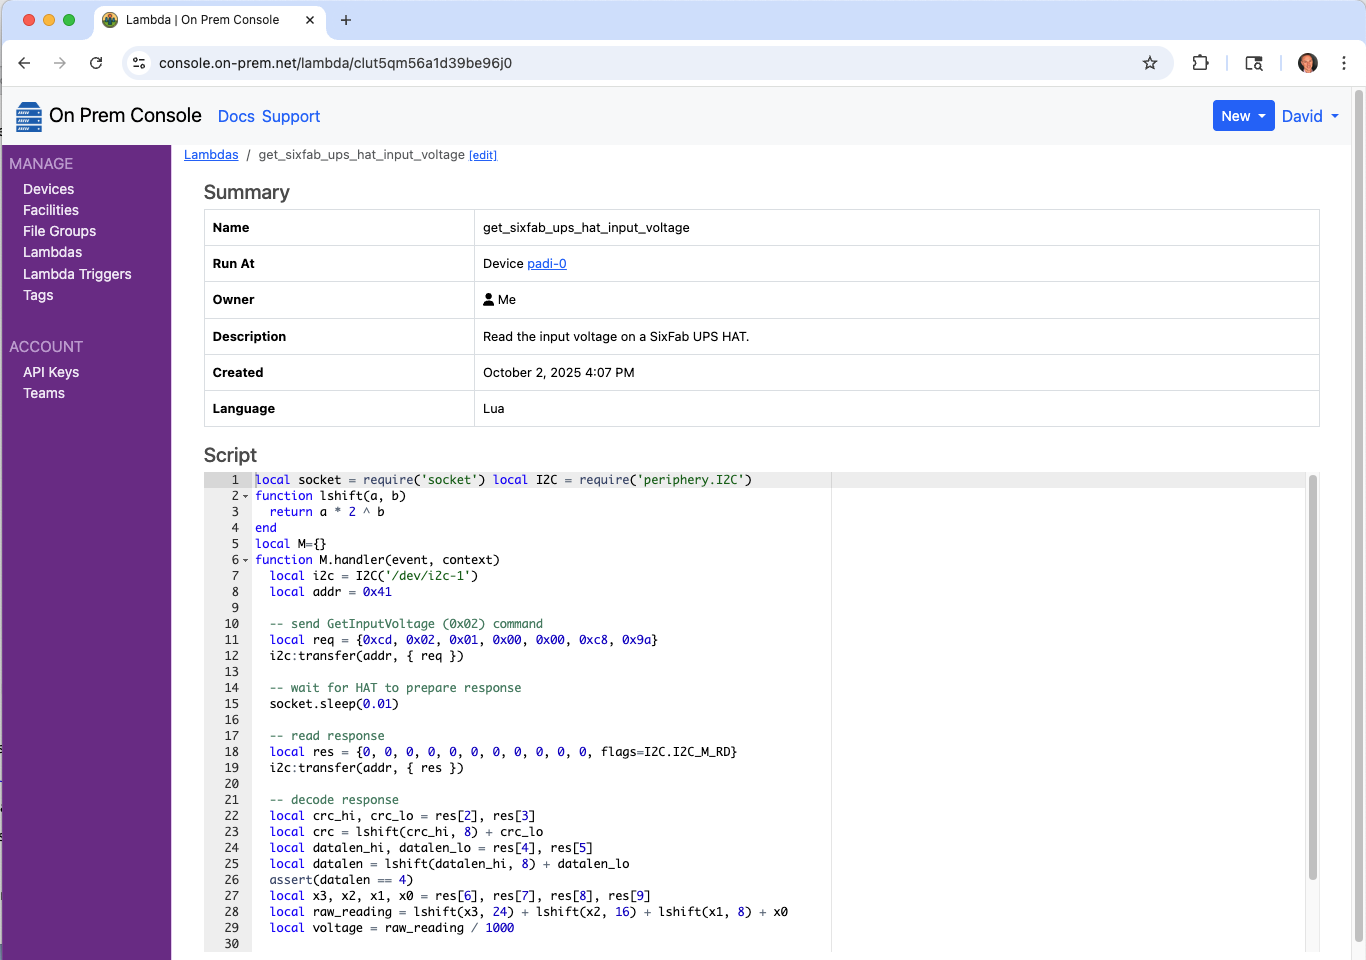
Register the lambda
$ onprem generate xid
clut5qm56a1d39be96j0
# get_sixfab_ups_hat_input_voltage.yaml
name: get_sixfab_ups_hat_input_voltage
kind: Lambda
id: clut5qm56a1d39be96j0
description: >
  Read the input voltage on a SixFab UPS HAT.
runAt:
  device:
    deviceId: ci2fabp32ckvhk1g9qe0
scriptContentType: Lua
script: >
  local socket = require('socket')
  local I2C = require('periphery.I2C')

  function lshift(a, b)
    return a * 2 ^ b
  end

  local M={}

  function M.handler(event, context)
    local i2c = I2C('/dev/i2c-1')
    local addr = 0x41

    -- send GetInputVoltage (0x02) command
    local req = {0xcd, 0x02, 0x01, 0x00, 0x00, 0xc8, 0x9a}
    i2c:transfer(addr, { req })

    -- wait for HAT to prepare response
    socket.sleep(0.01)

    -- read response
    local res = {0, 0, 0, 0, 0, 0, 0, 0, 0, 0, 0, flags=I2C.I2C_M_RD}
    i2c:transfer(addr, { res })

    -- decode response
    local crc_hi, crc_lo = res[2], res[3]
    local crc = lshift(crc_hi, 8) + crc_lo
    local datalen_hi, datalen_lo = res[4], res[5]
    local datalen = lshift(datalen_hi, 8) + datalen_lo
    assert(datalen == 4)
    local x3, x2, x1, x0 = res[6], res[7], res[8], res[9]
    local raw_reading = lshift(x3, 24) + lshift(x2, 16) + lshift(x1, 8) + x0
    local voltage = raw_reading / 1000

    -- respond
    return {voltage=voltage, rawReading=raw_reading, crc=crc}
  end

  return M
$ onprem apply get_sixfab_ups_hat_input_voltage.yaml
It will now show up in the cloud console.
Invoke it
$ onprem run lambda clut5qm56a1d39be96j0
{"crc":514,"rawReading":4928,"voltage":4.928}
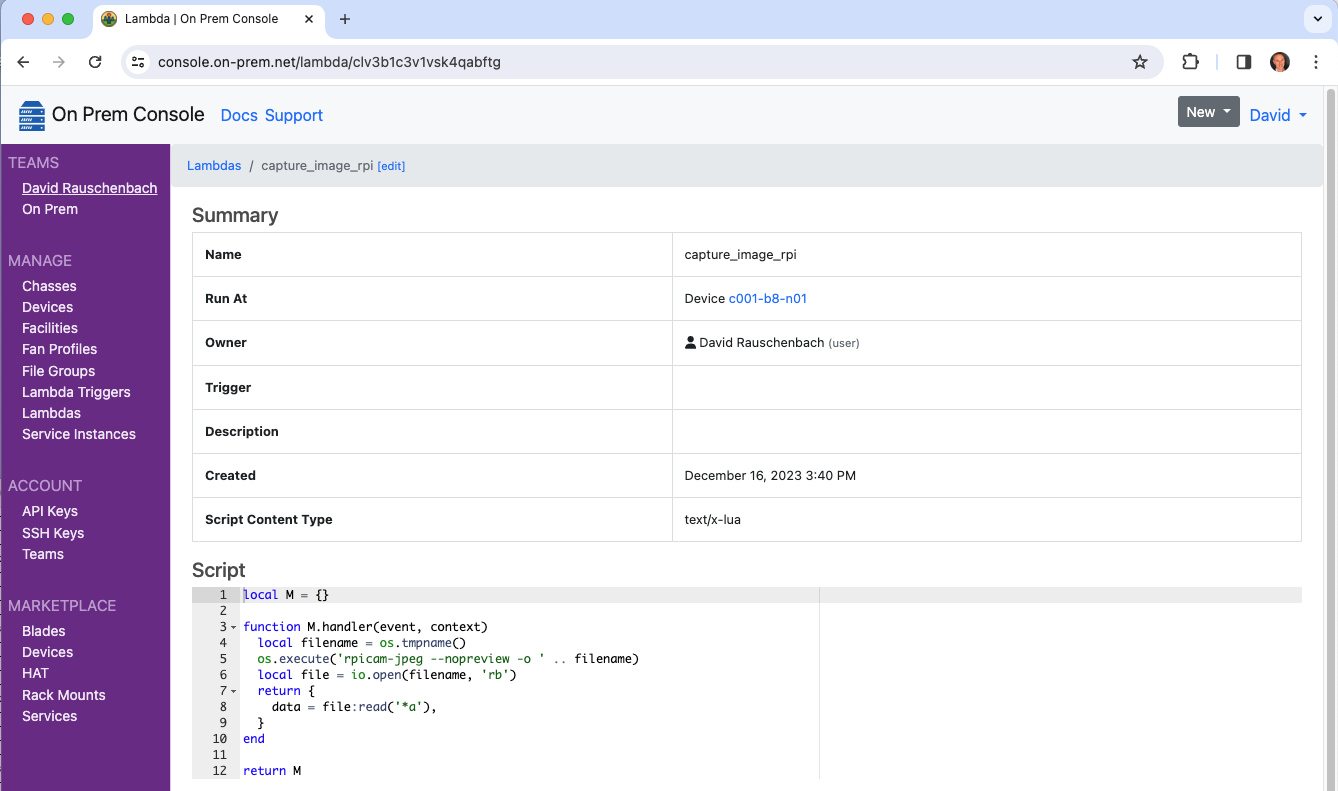
Take a Photo
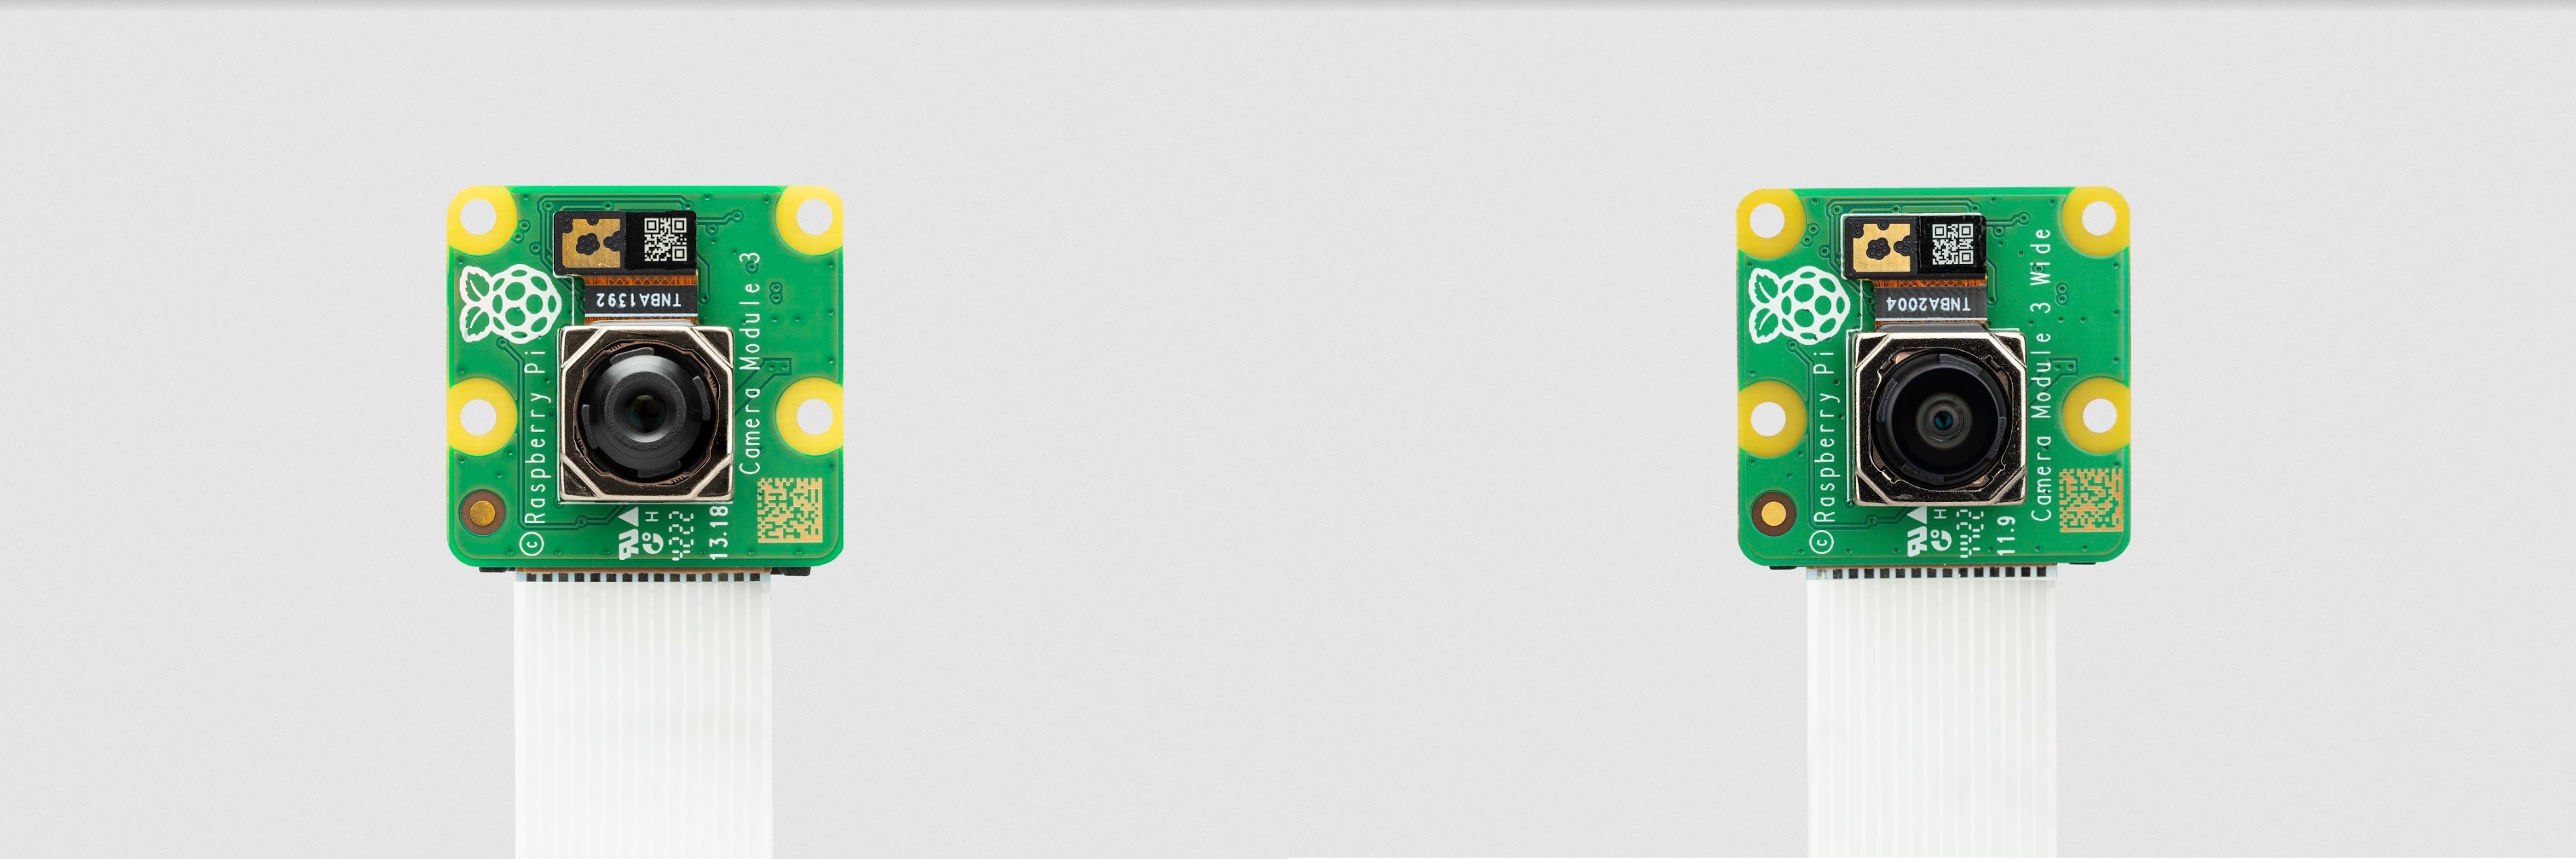
This lambda captures a still frame using a Raspberry Pi camera on a remote edge device.
The On Prem CLI is used to demonstrate manually triggering the lambda and taking delivery of the image from a remote desktop.
graph LR;

cli --> control_plane;
control_plane <-- tunnel --> agent;
agent --> camera;

subgraph user_edge[User Edge]
cli[CLI];
end

subgraph cloud[Cloud <small>api.on-prem.net</small>]
control_plane[Control Plane];
end

subgraph device_edge[Device Edge]
agent[Agent];
camera[Camera];
end
Note that manually triggering a lambda is unusual in that it requires device connectivity to the control plane. A more typical scenario is where Lambdas and their Controller's run loops run autonomously at the device edge, regardless of the device's connectivity to the control plane.
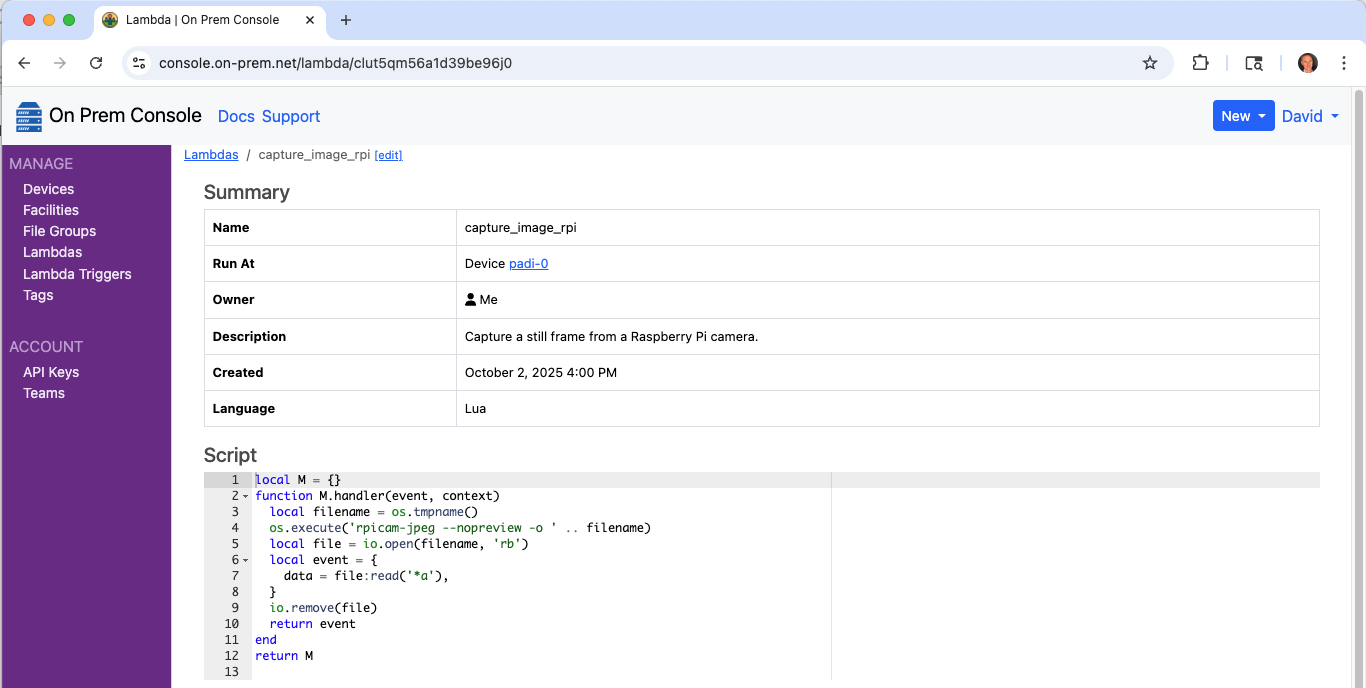
Register the lambda
$ onprem generate xid
clut5qm56a1d39be96j0
# capture_image_rpi.yaml
id: clut5qm56a1d39be96j0
kind: Lambda
name: capture_image_rpi
description: >
  Capture a still frame from a Raspberry Pi camera.
runAt:
  device:
    deviceId: ci2fabp32ckvhk1g9qe0
scriptContentType: Lua
script: >
  local M = {}

  function M.handler(event, context)
    local filename = os.tmpname()
    os.execute('rpicam-jpeg --nopreview -o ' .. filename)
    local file = io.open(filename, 'rb')
    local event = {
      data = file:read('*a'),
    }
    io.remove(file)
    return event
  end

  return M
$ onprem apply capture_image_rpi.yaml
It will now show up in the cloud console.
Invoke it
The CLI can display the returned event as JSON, which is inefficient:
$ onprem run lambda clut5qm56a1d39be96j0
{"data":[...much raw data...]}
But it can also pluck the data field out of the returned JSON, which is efficient and does not involve JSON
parsing. This is because agents return event data fields separately for efficient transport encoding.
If the returned event contains any other fields, they are displayed to stdout while other things are
written to stderr.
$ onprem run lambda clut5qm56a1d39be96j0 --event-data-to-file out.jpeg > event.json
Wrote event[data] to out.jpeg (940.9K)

$ cat event.json
{}

$ open out.jpeg

Take a Photo and Transform It
This lambda captures a still frame using a Raspberry Pi camera on a remote edge device, then runs it through a WASM based transform to convert it to grayscale, right at the source of the signal.
The On Prem CLI is used to demonstrate manually triggering the lambda and taking delivery of the image from a remote desktop.
graph LR;

cli --> control_plane;
control_plane <-- tunnel --> agent;
agent --> camera;
agent <-- transform --> grayscale_wasm;

subgraph user_edge[User Edge]
cli[CLI];
end

subgraph cloud[Cloud <small>api.on-prem.net</small>]
control_plane[Control Plane];
end

subgraph device_edge[Device Edge]
agent[Agent];
camera[Camera];
grayscale_wasm[grayscale.wasm];
end
Note that manually triggering a lambda is unusual in that it requires device connectivity to the control plane. A more typical scenario is where Lambdas and their Controller's run loops run autonomously at the device edge, regardless of the device's connectivity to the control plane.
Build the Transformer WASM Module
First follow the instructions in the WASM/Image Transforms example
to build a grayscale.wasm file and deploy it as a lambda to the control plane.
Deploy the Lambda to take a photo
Next deploy a lambda that takes the photo, then hands it off to the previously deployed chained lambda that will convert it to grayscale.
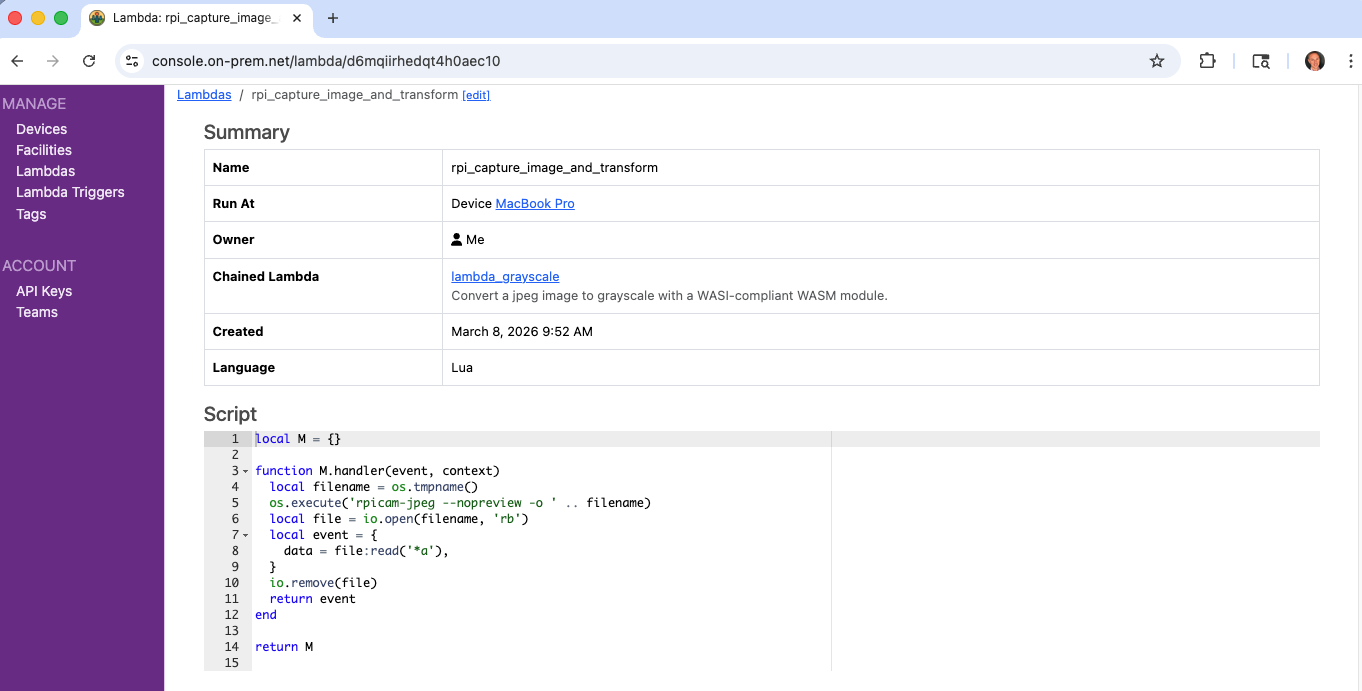
# rpi_capture_image_and_transform.yaml
id: d6mqiirhedqt4h0aec10
kind: Lambda
name: rpi_capture_image_and_transform
description: >
  Capture a still frame from a Raspberry Pi camera, then transform it to grayscale.
runAt:
  device:
    deviceId: ci2fabp32ckvhk1g9qe0
chainedLambdaId: d6hl1qhkun569e9bu6v0
scriptContentType: Lua
script: >
  local M = {}

  function M.handler(event, context)
    local filename = os.tmpname()
    os.execute('rpicam-jpeg --nopreview -o ' .. filename)
    local file = io.open(filename, 'rb')
    local event = {
      data = file:read('*a'),
    }
    io.remove(file)
    return event
  end

  return M
$ onprem apply rpi_capture_image_and_transform.yaml
Uploading import request...
Import complete
Operations performed:
┌────────────────────────┬─────────┬──────┬─────────┬─────────┬────────┐
│ Object                 ┆ Records ┆ Adds ┆ Updates ┆ Deletes ┆ Errors │
│ ---                    ┆ ---     ┆ ---  ┆ ---     ┆ ---     ┆ ---    │
│ str                    ┆ u32     ┆ u32  ┆ u32     ┆ u32     ┆ u32    │
╞════════════════════════╪═════════╪══════╪═════════╪═════════╪════════╡
│ ApiKeys                ┆ 0       ┆ 0    ┆ 0       ┆ 0       ┆ 0      │
│ Controllers            ┆ 0       ┆ 0    ┆ 0       ┆ 0       ┆ 0      │
│ ControllerTemplates    ┆ 0       ┆ 0    ┆ 0       ┆ 0       ┆ 0      │
│ Devices                ┆ 0       ┆ 0    ┆ 0       ┆ 0       ┆ 0      │
│ Facilities             ┆ 0       ┆ 0    ┆ 0       ┆ 0       ┆ 0      │
│ Lambdas                ┆ 1       ┆ 1    ┆ 0       ┆ 0       ┆ 0      │
│ LambdaTemplates        ┆ 0       ┆ 0    ┆ 0       ┆ 0       ┆ 0      │
│ Roles                  ┆ 0       ┆ 0    ┆ 0       ┆ 0       ┆ 0      │
│ Tags                   ┆ 0       ┆ 0    ┆ 0       ┆ 0       ┆ 0      │
│ Teams                  ┆ 0       ┆ 0    ┆ 0       ┆ 0       ┆ 0      │
└────────────────────────┴─────────┴──────┴─────────┴─────────┴────────┘
It will now show up in the cloud console.
Invoke it
The CLI can display the returned event as JSON, which is inefficient:
$ onprem run lambda d6mqiirhedqt4h0aec10
{"data":[...much raw data...]}
But it can also pluck the data field out of the returned JSON, which is efficient and does not involve JSON
parsing. This is because agents return event data fields separately for efficient transport encoding.
$ onprem run lambda d6mqiirhedqt4h0aec10 --event-data-to-file out.jpeg
Wrote event[data] to out.jpeg (371.0K)

$ open out.jpeg

Take Continuous Photos
This example demonstrates a Controller that repeatedly captures still frames from a Raspberry Pi camera.
Initial Provisioning
graph LR;

cli --> control_plane;
console --> control_plane;
control_plane <-- tunnel --> agent;

subgraph user_edge[User Edge]
cli[CLI];
console[Console];
end

subgraph cloud[Cloud <small>api.on-prem.net</small>]
control_plane[Control Plane];
end

subgraph device_edge[Device Edge]
agent[Agent];
end
Subsequent Autonomous Edge Operation
graph TB;

agent --> trigger[Controller];
trigger --> lambda1;
trigger --> lambda2;
trigger --> lambda3;
camera -- libcamera --> trigger;

subgraph device_edge[Device Edge]
agent;
camera[Camera]
end

subgraph agent[Agent]
trigger;
lambda1[Lambda 1];
lambda2[Lambda 2];
lambda3[Lambda 3];
end
Define the Controller
$ onprem generate xid
cmalphe56a11da41vqsg
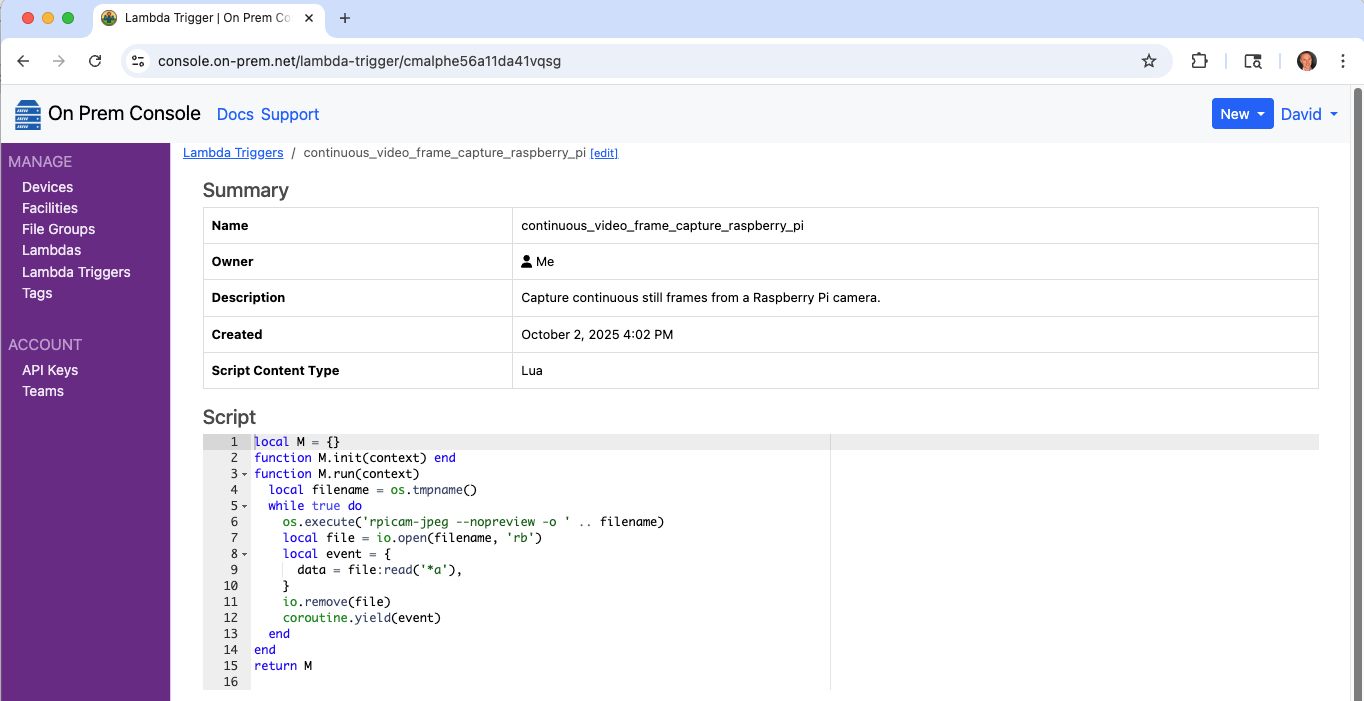
# continuous_video_frame_capture_raspberry_pi.yaml
id: cmalphe56a11da41vqsg
kind: Controller
name: continuous_video_frame_capture_raspberry_pi
description: >
  Capture continuous still frames from a Raspberry Pi camera.
scriptContentType: Lua
script: >
  local M = {}

  function M.init(context)
  end

  function M.run(context)
    local filename = os.tmpname()
    while true do
      os.execute('rpicam-jpeg --nopreview -o ' .. filename)
      local file = io.open(filename, 'rb')
      local event = {
        data = file:read('*a'),
      }
      io.remove(file)
      coroutine.yield(event)
    end
  end

  return M
Upload it to the control plane
$ onprem apply ./continuous_video_frame_capture_raspberry_pi.yaml
It will now show up in the cloud console, and will now show up as one of the trigger choices when editing a Lambda.
Configure a Lambda to respond
$ onprem generate xid
cmalqo656a11eos3sqb0
# process_image.yaml
id: cmalqo656a11eos3sqb0
kind: Lambda
name: process_image
description: >
  Process an image.
runAt:
  device:
    deviceId: ci2fabp32ckvhk1g9qe0
triggerId: cmalphe56a11da41vqsg
scriptContentType: Lua
script: >
  local M={}

  function M.handler(event)
    local imageData = event.data
    -- TODO ... add handling here
  end

  return M
$ onprem apply process_image.yaml
Manually Trigger for testing
The image processing lambda can be manually tested via the On Prem CLI from a remote desktop, using a locally provided image as input.
$ onprem run lambda cmalqo656a11eos3sqb0 --event-data-from-file ./my.png --event '{"param1": true, "param2": 23}'
Toggle a LED
This lambda toggles the state of led0 on a Raspberry Pi.
The On Prem CLI is used to demonstrate manually triggering the lambda and taking delivery of the event JSON from a remote desktop.
graph LR;

cli --> control_plane;
control_plane <-- tunnel --> agent;
agent --> led;

subgraph user_edge[User Edge]
cli[CLI];
end

subgraph cloud[Cloud <small>api.on-prem.net</small>]
control_plane[Control Plane];
end

subgraph device_edge[Device Edge]
agent[Agent];
led[LED];
end
Note that manually triggering a lambda is unusual in that it requires device connectivity to the control plane. A more typical scenario is where Lambdas and their Controller's run loops run autonomously at the device edge, regardless of the device's connectivity to the control plane.
Setup
Start by disabling the default triggering for led0, so that you can use it for your own purposes.
$ echo none | sudo tee /sys/class/leds/led0/trigger
Register the lambda
$ onprem generate xid
clutm1e56a1dn0f2p4dg
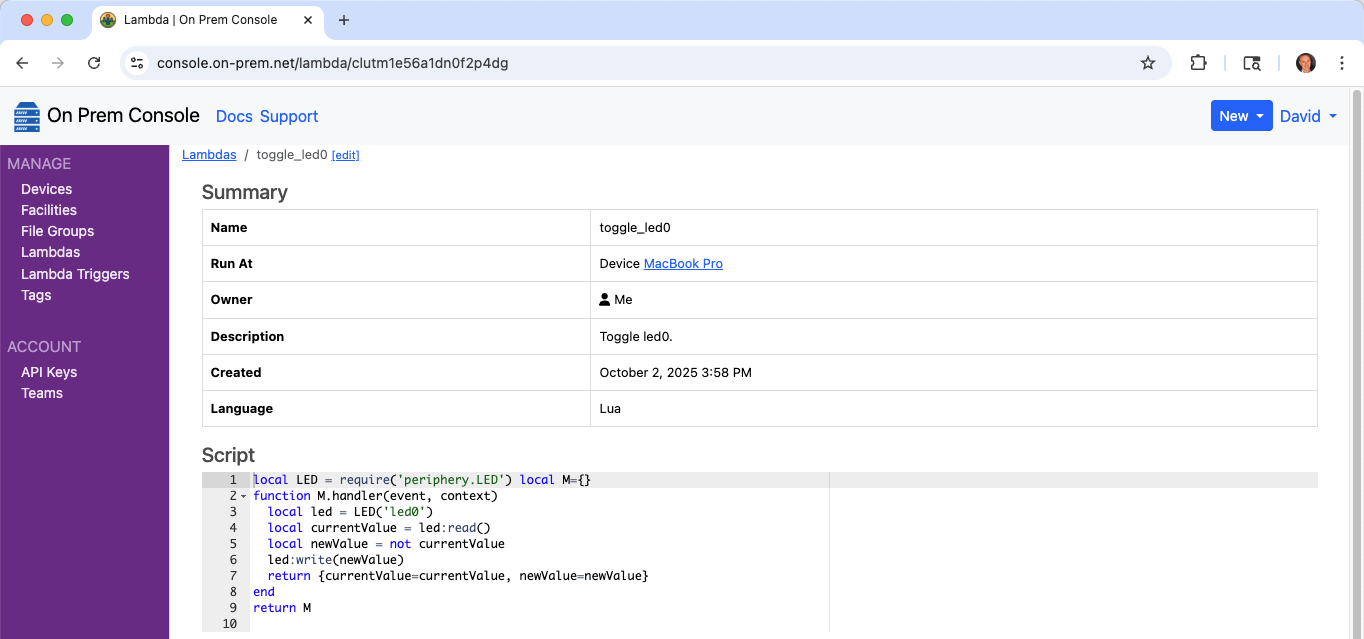
# toggle_led0.yaml
id: clutm1e56a1dn0f2p4dg
kind: Lambda
name: toggle_led0
description: >
  Toggle led0.
runAt:
  device:
    deviceId: ci2fabp32ckvhk1g9qe0
scriptContentType: Lua
script: >
  local LED = require('periphery.LED')
  local M={}

  function M.handler(event, context)
    local led = LED('led0')
    local currentValue = led:read()
    local newValue = not currentValue
    led:write(newValue)
    return {currentValue=currentValue, newValue=newValue}
  end

  return M
$ onprem apply toggle_led0.yaml
It will now show up in the cloud console.
Run it twice
$ onprem run lambda clutm1e56a1dn0f2p4dg
{"currentValue":true,"newValue":false}

$ onprem run lambda clutm1e56a1dn0f2p4dg
{"currentValue":false,"newValue":true}
Cleanup
Restore the default triggering for led0 with:
$ echo mmc0 | sudo tee /sys/class/leds/led0/trigger
Cookbook :: WASM
Call a Function in a WASM Module to Add One
A lambda may bundle one or more associated WASM modules that will be deployed to agents alongside the lambda. WASM modules may include functions that perform work such as signal processing or evaluation of AI or ML models that are easier to express in a language such as Rust.
This Rust based WASM module aims to demonstrate the simplest possible example by exporting
an add_one() function.
add_one.yaml
add_one.lua
Cargo.toml
src/
  lib.rs
lib.rs:
#![allow(unused)]
fn main() {
#[no_mangle]
pub extern "C" fn add_one(x: i32) -> i32 {
    x + 1
}
}
Cargo.toml:
[package]
name = "add-one"
version = "0.1.0"
edition = "2024"

[lib]
crate-type = ["cdylib"]
Build the WASM module:
$ rustup target add wasm32-unknown-unknown
$ cargo build --target wasm32-unknown-unknown --release
Register the lambda
$ onprem generate xid
cmv805656a11vubtf6pg
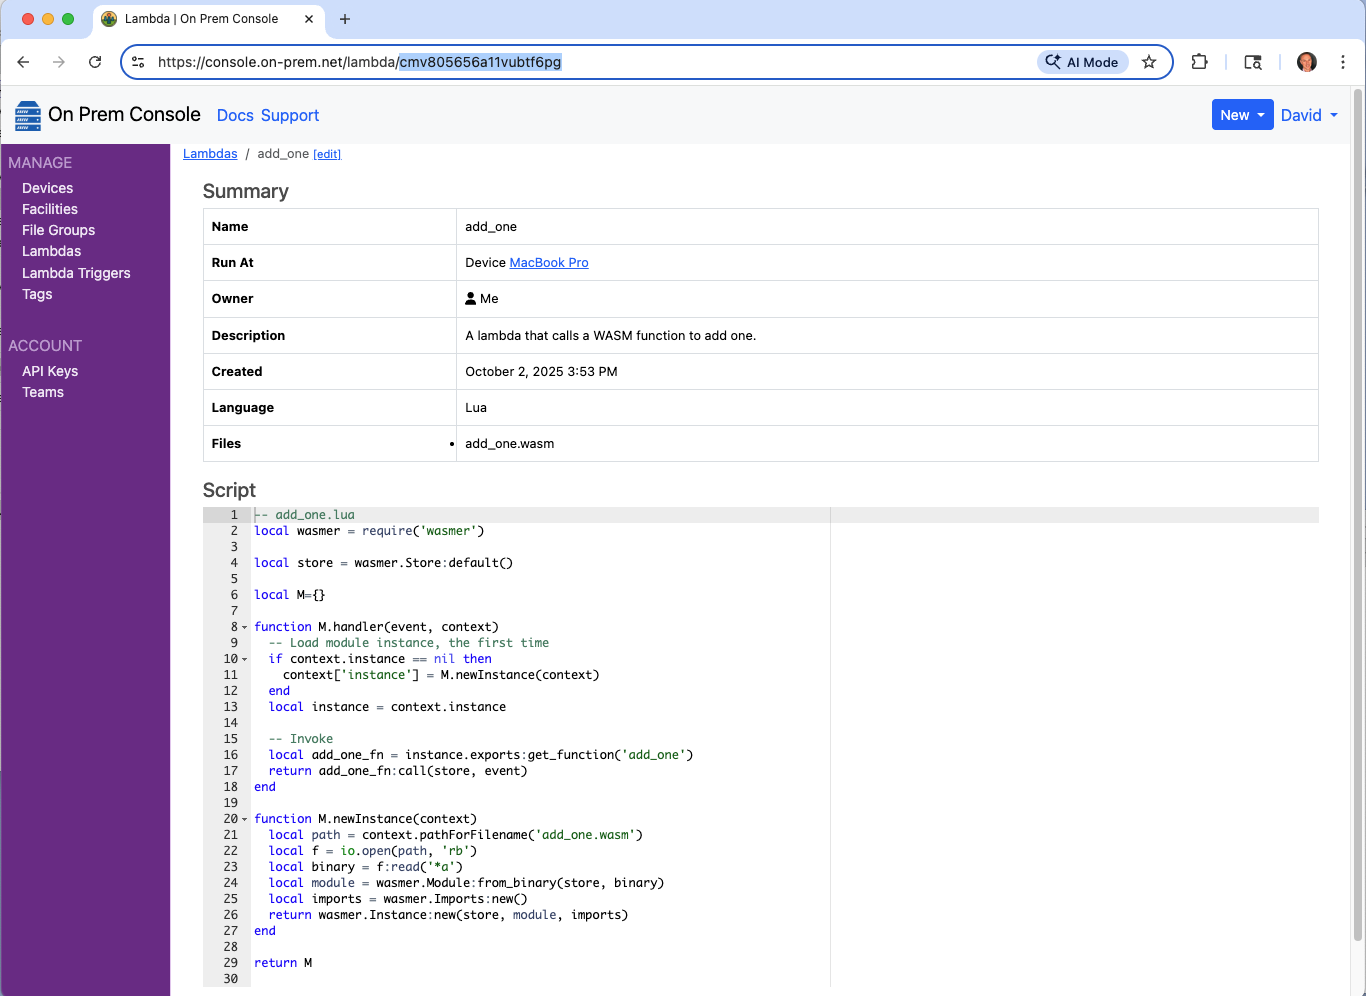
# add_one.yaml
id: cmv805656a11vubtf6pg
kind: Lambda
name: add_one
description: >
  A lambda that calls a function in a WASM module to add one.
runAt:
  device:
    deviceId: ci2fabp32ckvhk1g9qe0
fileIds:
  - "@target/wasm32-unknown-unknown/release/add_one.wasm"
scriptContentType: Lua
script: "@add_one.lua"
-- add_one.lua
local wasmer = require('wasmer')

local store = wasmer.Store:default()

local M={}

function M.handler(event, context)
  -- Load module instance, the first time
  if context.instance == nil then
    context['instance'] = M.newInstance(context)
  end
  local instance = context.instance

  -- Invoke
  local add_one_fn = instance.exports:get_function('add_one')
  return add_one_fn:call(store, event)
end

function M.newInstance(context)
  local path = context.pathForFilename('add_one.wasm')
  local f = io.open(path, 'rb')
  local binary = f:read('*a')
  local module = wasmer.Module:from_binary(store, binary)
  local imports = wasmer.Imports:new()
  return wasmer.Instance:new(store, module, imports)
end

return M
$ onprem apply add_one.yaml
If the agent is connected to the control plane, it will have downloaded its new config bundle containing the new lambda and associated WASM module file within a few seconds.
View Lambda in the Console
Notice the lambda now appears in the cloud console, and that it contains the associated WASM file add_one.wasm.
Run the Lambda
$ onprem run lambda cmv805656a11vubtf6pg --event '123'
124
Image Transforms
This Lambda converts a jpeg image to grayscale, using Rust code that is compiled to WASI-compliant WASM. It demonstrates the type of image transforms you may want to do at the source of the signal; for example, if your application involves a camera, you might want to convert to grayscale and downscale at the source of the signal, before passing the image along to downstream logic that performs object detection, collision detection, or some other kind of inference.
The source code can be found in the On Prem CLI repository at examples/lambda_grayscale.
How it works
In the On Prem platform, lambda events are JSON objects with a special data field reserved for binary content.
Every layer of the platform transfers the data field separately from the rest of the event object's other
fields, ensuring efficient transfer encoding that does not involve JSON parsing of any large content. Additionally,
event objects are conveyed as gRPC structs, further ensuring binary transfer encoding.
When an On Prem edge lambda is written in WASI+WASM, the input event is pre-processed by the On Prem edge agent,
and the data field is extracted and passed into the WASM module via stdin, while the other input event fields are
passed in as program arguments. Then, the transformed grayscale image is emitted via stdout, and the
On Prem agent conveys it to downstream chained lambdas, or a remote desktop in the case where
the lambda was manually triggered via the On Prem CLI, which is how one-shot testing of high-frequency
lambdas is typically done.
Assets
deployment.yaml
Cargo.toml
Makefile
src/
  main.rs
main.rs:
use image::ImageFormat;
use std::io::{self, Cursor, Read, Write};

fn main() -> anyhow::Result<()> {
    // Read
    let mut buf = Vec::new();
    io::stdin().read_to_end(&mut buf)?;

    // Convert
    let img = image::load_from_memory(&buf)?;
    let transformed = img.grayscale();

    // Serialize to a buffer
    let mut buf: Vec<u8> = Vec::new();
    transformed.write_to(&mut Cursor::new(&mut buf), ImageFormat::Jpeg)?;

    // Write
    io::stdout().write_all(&buf)?;
    io::stdout().flush()?;
    Ok(())
}
Cargo.toml:
[package]
name = "on-prem-example-lambda-grayscale"
description = "An On Prem edge lambda that converts a jpeg to grayscale using a WASI-compliant WASM module"
version = "0.1.0"
edition = "2024"

[[bin]]
name = "grayscale"
path = "src/main.rs"

[dependencies]
anyhow = "1.0"
image = { version = "0.25.9", default-features = false, features = ["jpeg"] }
Makefile:
.PHONY: build
build:
	rustup target add wasm32-wasip1
	cargo build --target wasm32-wasip1 --release


.PHONY: clean
clean:
	cargo clean
deployment.yaml:
id: d6hl1qhkun569e9bu6v0
kind: Lambda
name: lambda_grayscale
description: Convert a jpeg image to grayscale with a WASI-compliant WASM module.
runAt:
  device:
    deviceId: d5vmhgk3ofhmc59g2870
fileIds:
  - "@target/wasm32-wasip1/release/grayscale.wasm"
scriptContentType: None
Building and Testing
First build the WASM module:
$ make
Use a local jpeg file as a test input. Examine the input file:
$ open in.jpg

Now test the image transform locally, before moving it to your edge environment:
$ wasmer run target/wasm32-wasip1/release/grayscale.wasm < in.jpg > out.jpg
Examine the output file:
$ open out.jpg

Deploying
Customize the runAt field in your deployment to point to one of your device ids. These can be
taken from the URL when using the cloud console.
$ vi deployment.yaml
runAt:
  device:
    deviceId: d5vmhgk3ofhmc59g2870
Next, upload it, along with the lambda definition, to the control plane:
$ onprem apply deployment.yaml
Uploaded grayscale.wasm (465.7K bytes)
File assets found: 1
Uploading import request...
Import complete
Operations performed:
┌────────────────────────┬─────────┬──────┬─────────┬─────────┬────────┐
│ Object                 ┆ Records ┆ Adds ┆ Updates ┆ Deletes ┆ Errors │
│ ---                    ┆ ---     ┆ ---  ┆ ---     ┆ ---     ┆ ---    │
│ str                    ┆ u32     ┆ u32  ┆ u32     ┆ u32     ┆ u32    │
╞════════════════════════╪═════════╪══════╪═════════╪═════════╪════════╡
│ ApiKeys                ┆ 0       ┆ 0    ┆ 0       ┆ 0       ┆ 0      │
│ Controllers            ┆ 0       ┆ 0    ┆ 0       ┆ 0       ┆ 0      │
│ ControllerTemplates    ┆ 0       ┆ 0    ┆ 0       ┆ 0       ┆ 0      │
│ Devices                ┆ 0       ┆ 0    ┆ 0       ┆ 0       ┆ 0      │
│ Facilities             ┆ 0       ┆ 0    ┆ 0       ┆ 0       ┆ 0      │
│ Lambdas                ┆ 1       ┆ 1    ┆ 0       ┆ 0       ┆ 0      │
│ LambdaTemplates        ┆ 0       ┆ 0    ┆ 0       ┆ 0       ┆ 0      │
│ Roles                  ┆ 0       ┆ 0    ┆ 0       ┆ 0       ┆ 0      │
│ Tags                   ┆ 0       ┆ 0    ┆ 0       ┆ 0       ┆ 0      │
│ Teams                  ┆ 0       ┆ 0    ┆ 0       ┆ 0       ┆ 0      │
└────────────────────────┴─────────┴──────┴─────────┴─────────┴────────┘
If the agent is connected to the control plane, it will have downloaded its new config bundle containing the new lambda and associated WASM module file within a few seconds.
Run the Lambda
Now ask the control plane to invoke the lambda on the remote edge device.
$ onprem run lambda d6hl1qhkun569e9bu6v0 --event-data-from-file in.jpg --event-data-to-file out.jpg
Wrote event[data] to out.jpg (28.5K)
{}